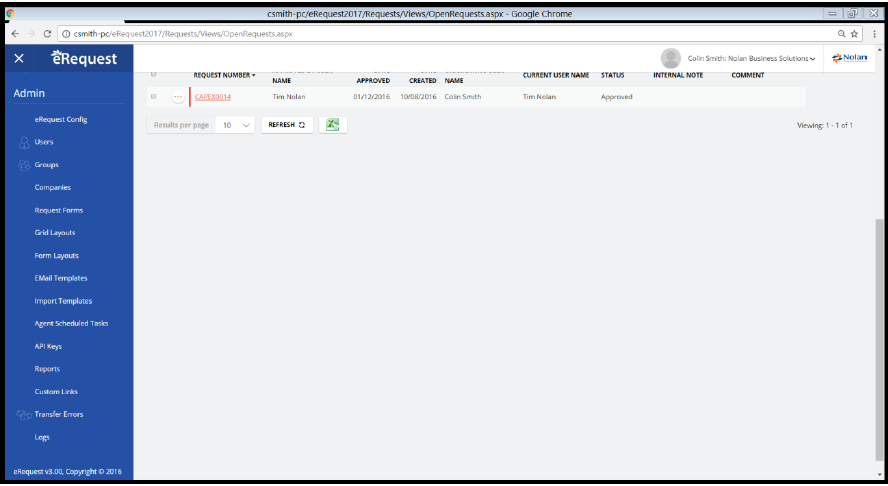
General Administration Setup
eRequest Administration is now incorporated into the main site. If the user who is logged in has Administrator privileges the Admin Options are visible on the eRequest Menu Bar.
eRequest Configuration
This section contains the general options for eRequest.
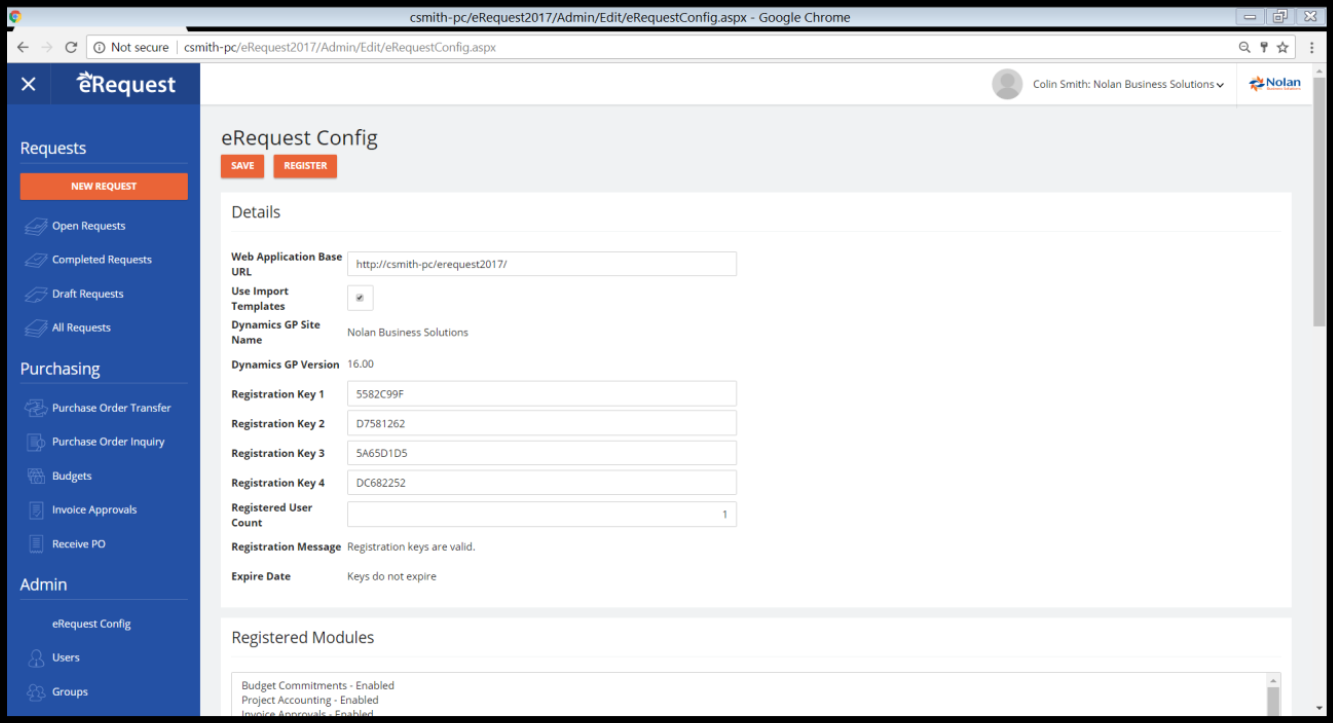
Web Application Base URL – Enter the first part of the applications URL. This parameter is used by the application to navigate the user back when they have used a feature which causes another application to open such as when viewing an external document.
Use Import Template – Further in this manual we will discuss the Import functionality. Ticking this option will enable this functionality should your site require it.
Registration Keys - Your eRequest registration keys can be entered here; additional modules can be turned on by the registration keys. The modules enabled are indicated in the Registered Modules list. Once you have entered your keys also enter the ‘Registered User Count’ this should match the keys you were issued with. Click on the ‘Register’ button at the top of the window, to validate the keys and register the software for your site.
NOTE: The ‘Registered User Count’ controls how many users in eRequest can be active. Only active users can login into eRequest. Where the ‘Registered User Count’ is 1, this is effectively treated as unlimited.
If you have made any changes to this window, click the ‘Save’ button to commit your changes.
eRequest Setup - Branding
The Branding option allows you to upload your own logo to use on the site. The logo is stored in the database and the Download button enables you to retrieve the logo from the database. To replace the logo, Press the Choose a File button, select the file from your local drive and press the Upload Button. The New Logo will be visible on the login window and at the top right hand corner of every page in eRequest.
eRequest Setup - Email Configuration
eRequest sends eMails at various stages in the life cycle of a request, the setting on this page provide the Outgoing and Incoming email settings

Outgoing Mail
From Address Options – This controls which email address is used as the ‘from’ address on Emails sent by eRequest.
Use actioning user’s Email Address – When the email results from another users action the ‘actioning’ users email address will be used as the from address eg. A user submits a request for approval. Where no user originated the action, the ‘Application Email Address’ will be used.
Use ‘Application’ Email Address – When selected all the email sent from eRequest will be ‘from’ the ‘Application Email Address’. The reply to address will still show the ‘actioning’ users email address where available.
Application Email Address – The Email address for the eRequest Application.
Allow Email CC on Submit – Enabled the CC user list on the Submit to Dialog
Incoming Mail (eMail Response Actions)
Use Email Response Actions – eRequest can send Emails for certain actions which contain links allowing an Email response. These Emails are returned to a Mail box on your Mail Server, eRequest’s Agent service can monitor this mail box and perform actions based on mail received. To enable this, tick this option. You will then need to enter information about the Mail account; eRequest uses the POP3 protocol to read the Mailbox.
Mailbox Email Address – This is the email address of the Mailbox, this will be set as the return address on emails sent out which require a response. When the ‘From Address Option’ is set to ‘Use Application Email Address’, this field is disabled the ‘Application Email Address’ will be used and the POP3 Mail should be setup to use this address.
User Name, Password – Enter the user name and password for the user who owns the Mail box
Email Interface – eRequest can use different interface for sending and receiving Emails.
SMTP and POP3, these are well known standards and will be available from most mail systems, including Gmail and Office 365
Office 365 through MS Graph API, This is specific to people using Office 365 for their mail system, who have disabled the Legacy Connections (This disabled SMTP and POP3). Office 365 offers the Graph API for Mail Integration. This requires an Application Registration for eRequest on Azure
Select the option you wish and enter the Connection details
Email Interface: SMTP and POP3 Configuration
When using an internal SMTP server, these generally have no authentication. But probably require the ‘from’ address of any mails sent through them to belong to your mail domain, so you can use the ‘From Address Option’ of ‘Use actioning user’s Email address.
When using an external SMTP server, such as Gmail or Office 365. You will need to create an account for eRequest to send mail from. Something like eRequest@company.com. Set the ‘From Address Option’ to ‘Use Application Email Address’ and enter the accounts email address in the ‘Application Email Address’ field.
Gmail and Office 365, both use TLS encryption, please look up the SMTP settings for your particular service, and enter them into eRequest. The user name will generally be the Email address so should be set the same as the ‘Application Email Address’ Field, enter the password, domain should be left blank, unless required.
Emails sent by eRequest will use the ‘Application Email Address’ as the ‘from’ address on mails so this must match the Credentials entered to access the SMTP server. NOTE: both Gmail and Office 365, will ‘rewrite’ the ‘from’ address on mails sent through the SMTP to match the credential used to access it (see ‘from address rewriting’ in the instruction for your service)
SMTP Mail Server – The SMTP Server for eRequest to use when sending outgoing mail.
SMTP Credentials – Authentication for SMTP server
None – No Authentication is needed.
Send as Plain Text – Credentials are sent as plain text.
Use TLS encryption – Credentials are sent using TLS encryption
SMTP User Name, Password and Domain – enter your SMTP credential here. Domain is not required; you may only have a User name and Password.
SMTP Port Number – The port number for SMTP, generally this is 25. But for TLS encryption you will need to check the SMTP Server Setup to determine the port.
POP3 Mail Server – This is the name of your POP3 Mail server (NOTE: You may need to configure POP3 on your mail server to enable it, consult your Mail Server documentation for this)
POP3 Login Method – If you have ‘Plain text login’ select that, more likely the login will be secured with TLS
POP3 TLS Certificate Name – If TLS is enable you must enter the Certificate name here, you will find this in your mail servers POP3 Configurations, under ‘User Connections’ or similar.
POP3 Password – Enter the Password for the User who own the POP3 Mail Box
Email Interface: Office 365, through Graph API
Office 365 and Exchange On-line provide an interface for sending and receiving email which is specific to Office 365. Only use this interface where SMTP and POP3 have been disabled, or you require the additional security features of this interface.
This interface works by registering eRequest as an Application in your Azure AD Tenant (Directory). Then adding permissions to this which allow it to access the Graph API (Which provided the Mail Send and Receive functionality)
Create an App Registration on MS Azure. If you are using Azure AD as your Authentication you will have already created an App Registration on MS Azure, please use the existing Application and just perform the 'Graph API Access' steps
Create an App Registration
Goto the Azure Portal, and search for 'App Registrations
Select 'New Registration
Enter 'eRequest' for Application Name
Select Web App/API
Register the Application
Copy and Paste the 'Application (Client) ID' into the field below
Add Graph API Access
Select the eRequest application
Copy and Paste the 'Dictionary (tenant ID) ID' into the field below
Under 'Certificates & Secrets' add a client Secret called 'Access' copy and paste the password to the field below
Under 'API Permissions' add the following 'Application Permissions'
Microsoft Graph.Mail.Read
Microsoft Graph.Mail.ReadWrite
Microsoft Graph.Mail.ReadBasic.All
Microsoft Graph.Mail.MailSend
Click the 'Grant admin consent for ... ' button
Application ID – Enter the Application ID from the Azure Application Registration page
Tenant ID – This is your Tenant (Directory ID)
Application Secret –Enter the Password assigned to the Application when it is registered in Azure.
Company Setup
Select The Companies Option in the Admin section to open a page displaying all of the Dynamics GP companies that you have registered.
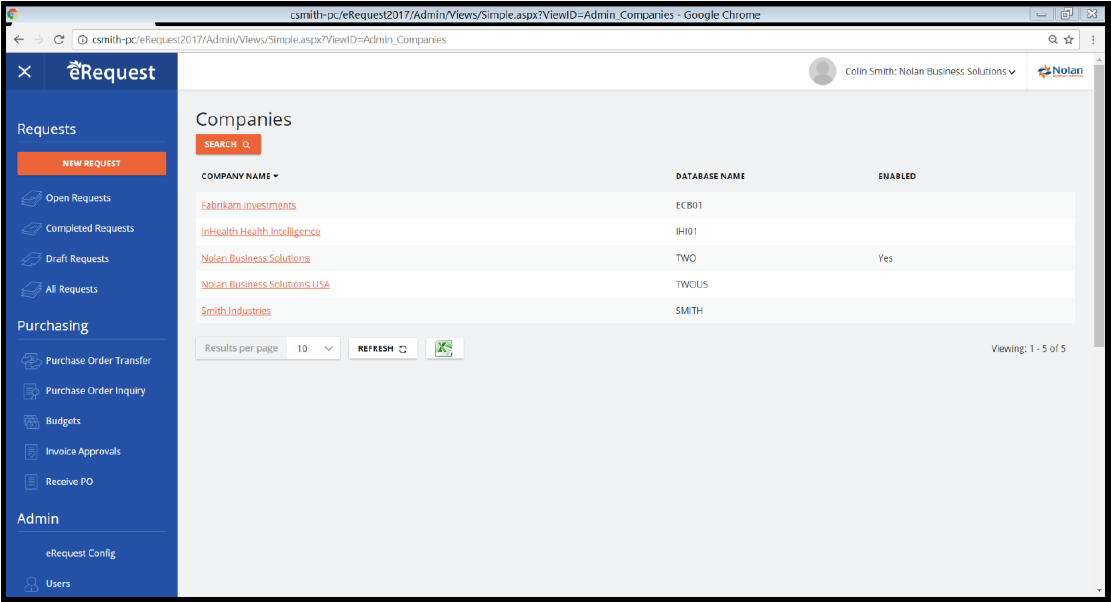
By clicking the Company Name Hyperlink, you will be taken to the form which allows you to manage the configuration options for that company
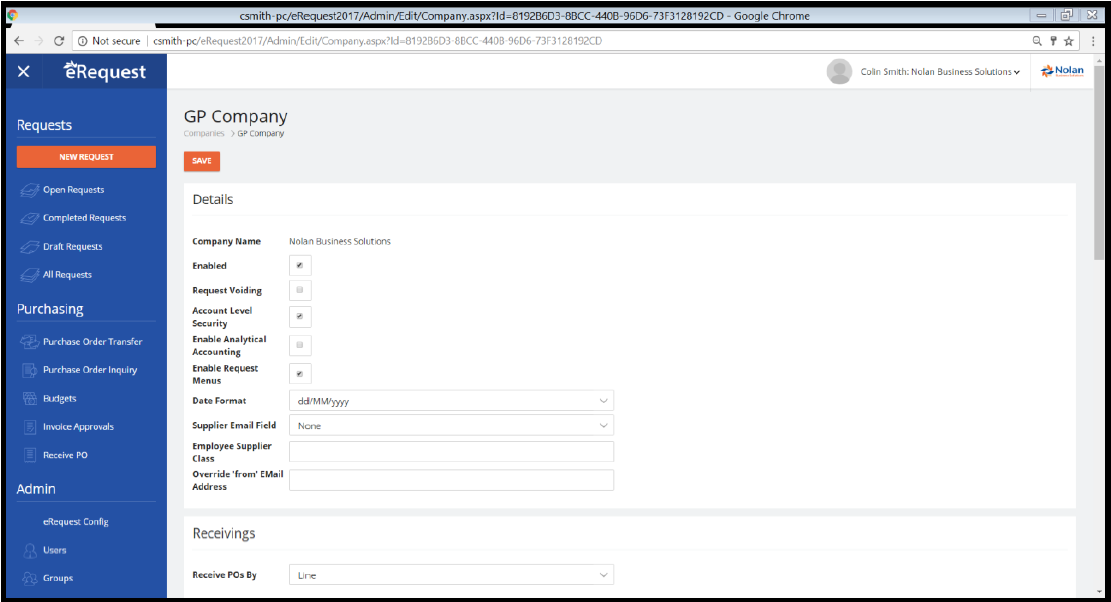
This section allows Dynamics GP companies to be enabled for use with eRequest, and to setup the options associated with that company.
Enabled - To enable a company click on the “Enabled” option so that it displays a tick in the box. To diable a company, untick the box
Request Voiding – When this option is enabled, requests deleted will get moved to a voided status and be viewable in search
Account Level Security – Enables/Disables Account Level Security
Enable Analytic Accounting – If this option is ticked, when an account is defaulted or selected on eRequest that has Analytic Accounting dimensions and codes enabled, these will be available to be selected.
Enable eRequest Menu – If this option ìs enabled, both eRequest and Invoice Approvals menu options are available on the Menu Bar. If the option is not ticked, Only Invoice Approvals potions are available
Date Format – Available formats are:
M/d/yy - M/d/yyyy - MM/dd/yy - MM/dd/yyyy
d/M/yy - d/M/yyyy - dd/MM/yy - dd/MM/yyyy
yy/M/d - yyyy/M/d - yy/MM/dd - yyyy/MM/dd
Supplier Email Field – This field allows you to select which field in Dynamics GP holds the supplier email address. The options are:
None E-mail Home Page FTP Site
Image Login Password User Defined 1 User Defined 2
Employee Supplier Class – For certain request types, the suppliers may be employees. This option allows you to specify the Supplier class in Dynamics GP which categorises your employees. The supplier lookup window will not display supplier address details for any supplier in this class.
Receipt POs by
Line – When going to the Receivings page within eRequest, you can select any lines from the outstanding POs created by requests from your group, you end a Ship Quantity and simple click the receive button. eRequest will then create receipts as appropriate.
Document – When going to the Receivings page within eRequest, you enter a Receipt more similar to GP, by picking a Vendor ID, enter the Reference, Receipt Date. Then you add the lines to receipt to the receipt, editing the Ship Quantity as you wish.

Invoice Approvals – Validate Distributions on Save - Within the Invoice Approvals module, approvers can amend invoice posting distributions. In some instances an approver may only partially code the distributions and so if this option is not ticked, the user will be able to save the distributions without the invoice being fully coded. If this option is ticked, the value of the distributions must equal the value of the invoice before it can be saved.
Invoice Approvals – require note for rejection - On rejecting an invoice, entering details of why it has been rejected will be required if this option is ticked.
Invoice Approvals – PO report – lookup or enter the name of the report layout which will be used to allow the user to view the details of the Purchase Order.
Document Management – Select the Document Management system being used.
eRequest
Invoice Zoom URL – A button is active on the window which displays the status of a request line and the Purchase Invoice/Shipment details. When pressed, this button will call the URL specified in order to display scanned images of the invoice if scanning is used.
The following field tags can be included and will be substituted with the document values at runtime:
@ReceiptNumber, @VendorId, @POPRcptNum, @VendDocNum, @VoucherNum, @DBName
EASY
Invoice Zoom URL – A button is active on the window which displays the status of a request line and the Purchase Invoice/Shipment details. When pressed, this button will call the URL specified in order to display scanned images of the invoice if scanning is used.
The @Barcode field tags can be included and will be substituted with Barcode reference stored against the document.
Filestream
Endpoint URL – This is the Filestream Web Service Endpoint Url. A button is active on the window which displays the status of a request line and the Purchase Invoice/Shipment details. When pressed, this button will call the URL specified in order to display scanned images of the invoice if scanning is used.
Database – The Filestream Database.
User Name – Filestream User Name used for Web Services.
Password – Filestream login password used for Web Services.
Barcode Field – The Name of the field in Filestream that contains the barcode information when documents are indexed.
Company Access
Use this setup option to grant or deny users access to use this company in eRequest. All users setup in the system will be displayed and you can set their access by clicking on the hyperlink Login ID.
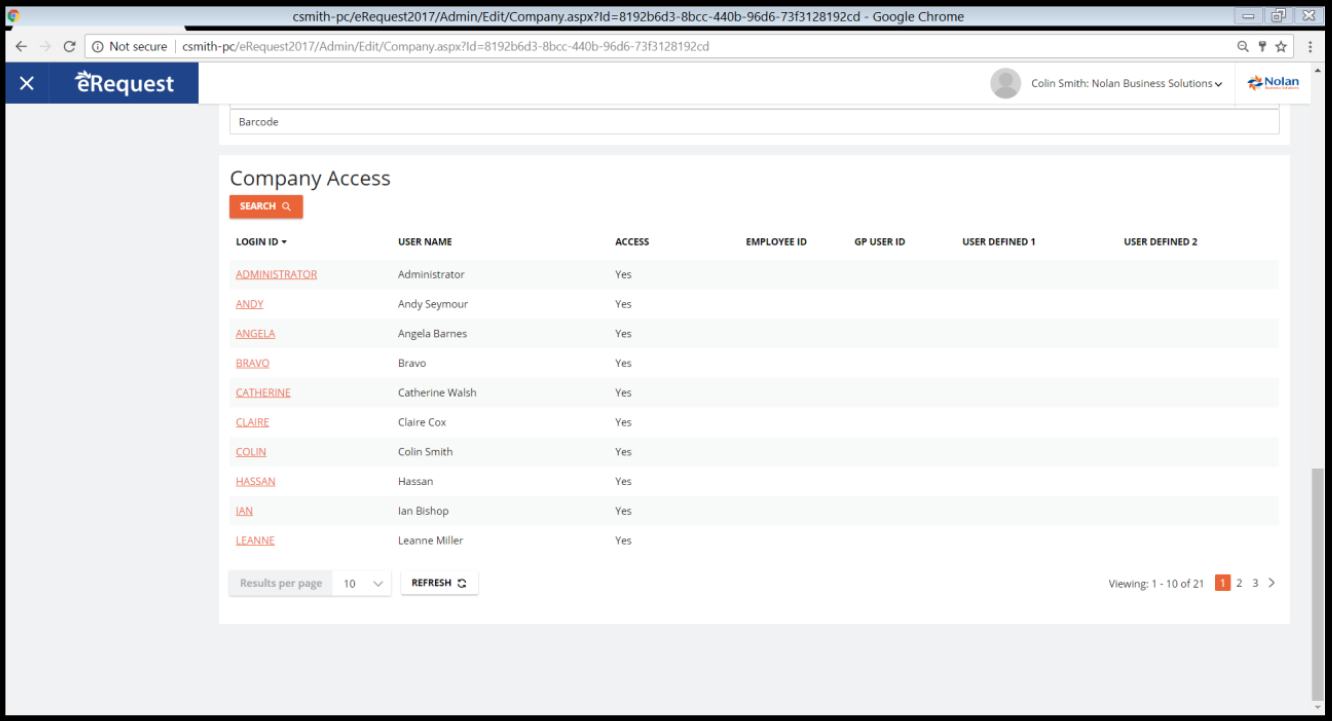
On selecting the Hyperlink Login ID, the Company User Access form will open where you can tick the Access Enabled Box to grant access and untick it to disable access.
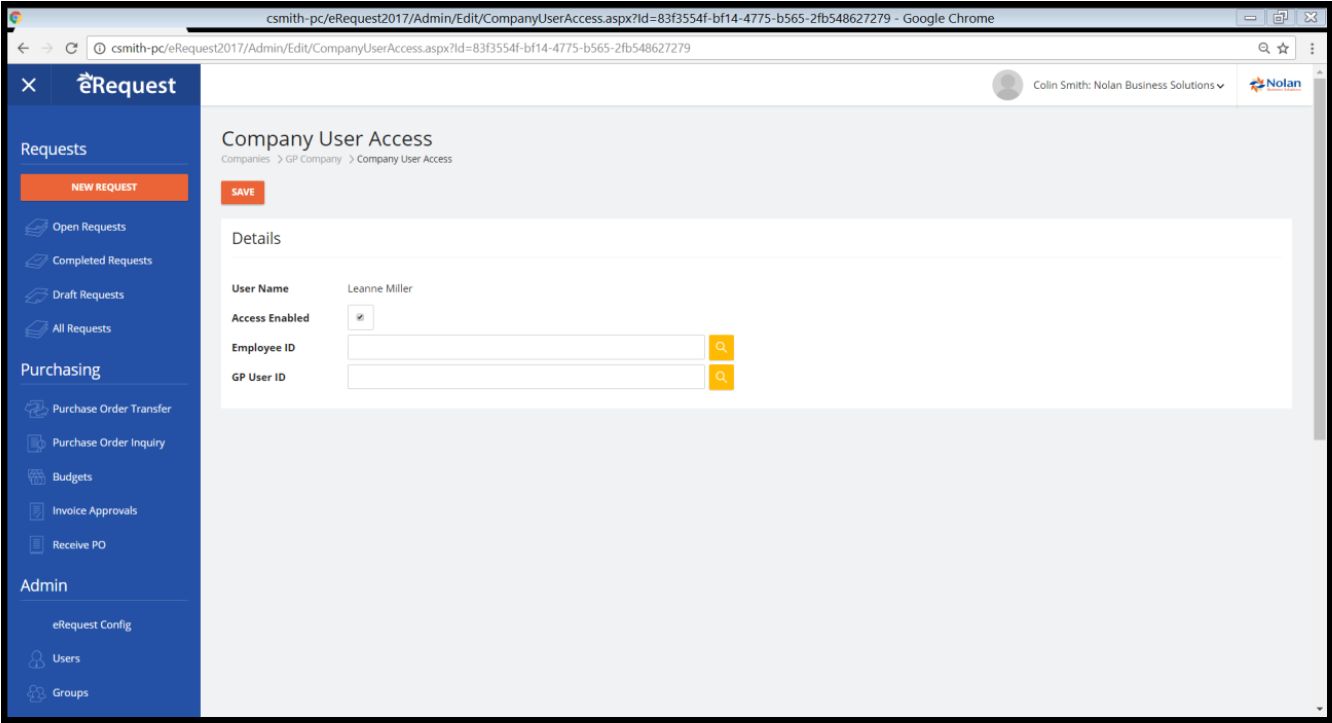
Employee ID – This is required for Project accounting users and links the eRequest User in this company to an Employee ID setup in Payroll in Dynamics GP. Employee IDs are used in Project Accounting to grant or deny access for the user to specific Projects. You do not need to have specific Employee IDs as multiple eRequest Users can be assigned to a ‘Generic’ Employee ID if required.
GP User ID – This is required for Account level Security. If you are using Account level security in Dynamics GP you will have assigned a set of General Ledger accounts to a specific User or User Class. Select in this field the specific GP user or GP User Class that relates to this user in this company so that the eRequest User will inherit their Account level Security.
User Setup
This section allows eRequest Users to be created and Modified.
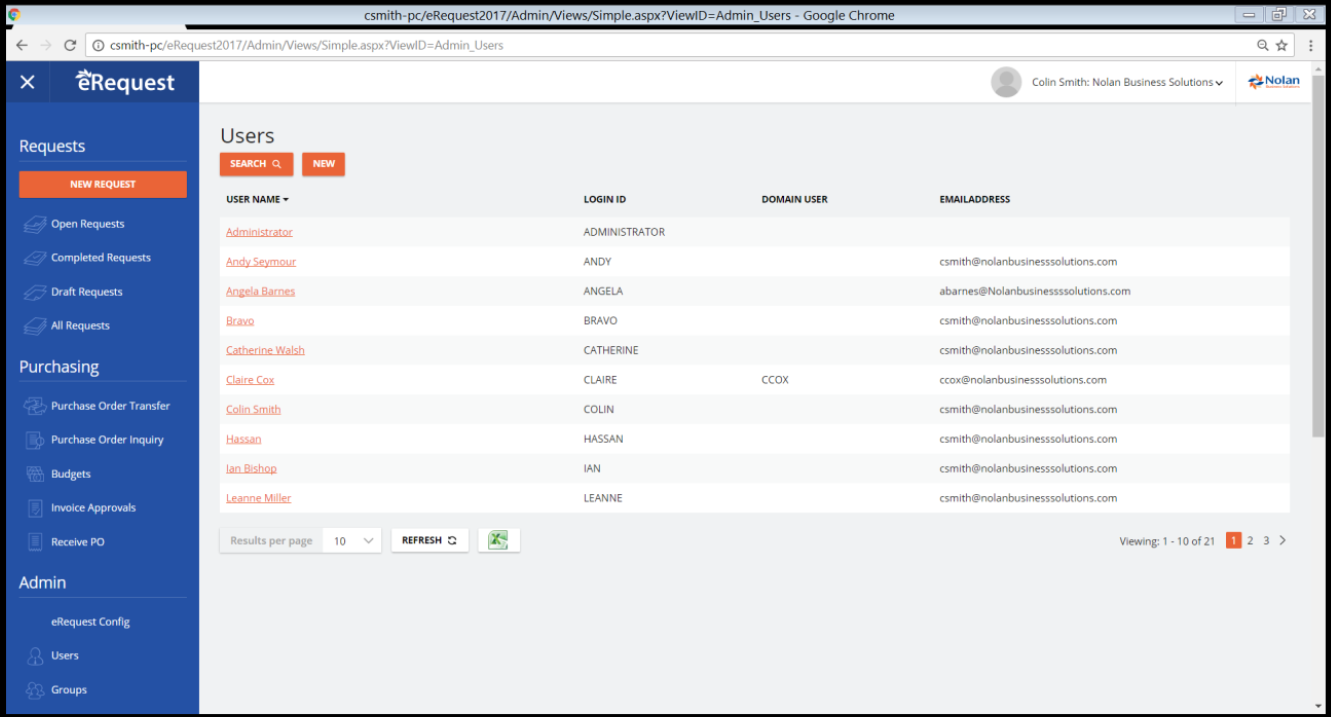
To create users, press the ‘New’ button. You will need to create a user for each person who needs to use eRequest.
To delete users, Select the user using the hyperlink on the Username and you will be able to access the delete button in the User Setup form. Note: You cannot delete a user which owns requests. (See taking ‘Reassign Requests’)
To clone an existing user, Select the user using the hyperlink on the Username and you will be able to access the ‘Clone’ button in the User Setup form. This will make a new user by copying the details of the selected one. You can pick which details are copied to the new user.
To Reassign Requests owned by that user, Select the user using the hyperlink on the Username and you will be able to access the ‘reassign requests’ button in the User Setup form.. As a user can originate a Request and can also be the current owner of a request.
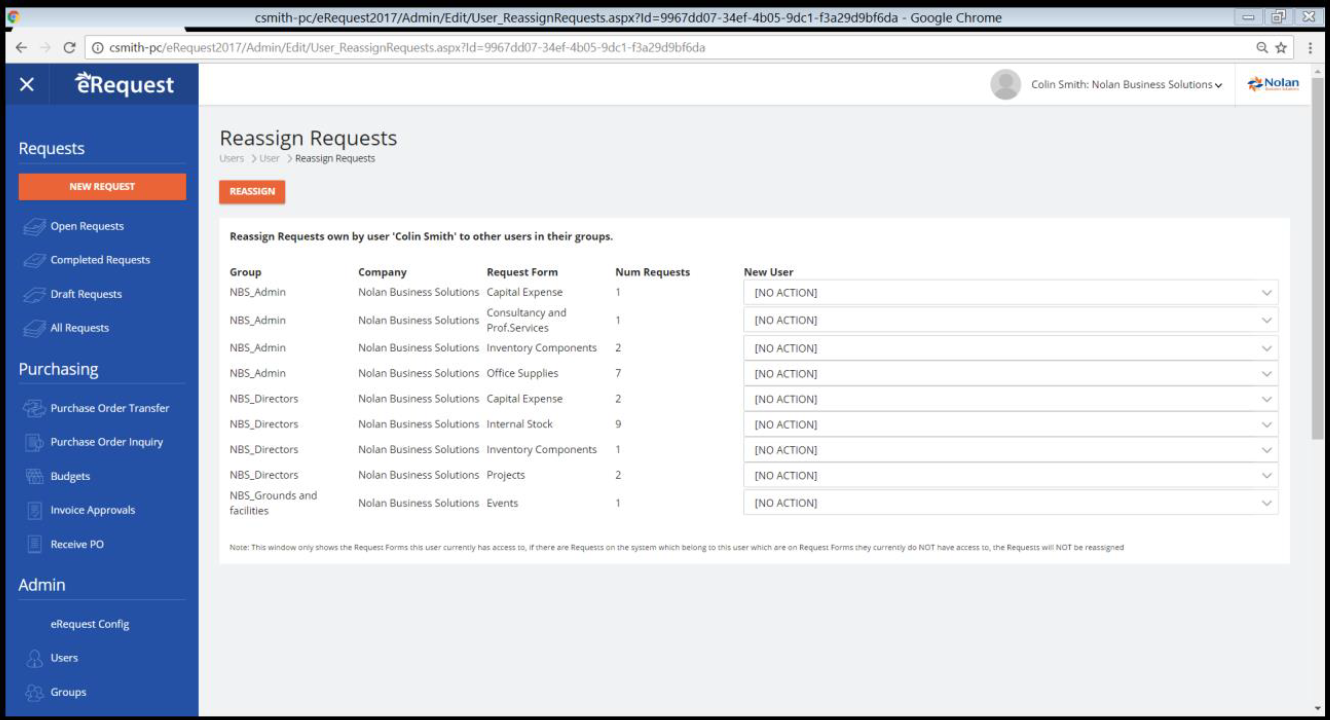
The form shows the current requests owned or originated by the selected user. It is broken down by Group, Company and Request Form. Pick the new user from the ‘New User’ dropdown list. Note: You can only pick Users who are in the same group and request form. Once you have selected all the new users, click OK to transfer the ownership.
Once a user has NO requests originated or owned by them, they can be deleted from the system.
To edit an existing User click on the user, and the right hand side of the window will show the users details.

User Name – The actual name of the user, this is how the user will be referred to within eRequest.
Email Address – The email address for this user. When eRequest sends emails this address will be used.
If AD Integration is Disabled
Login ID – This is the id used on the eRequest login page
Password – The password required when the user logs in.
If AD Integration is Enabled
Domain User – The Active Directory User that is associated with this eRequest User
Administrator – This box is ticked if the user is an administrator. If this box is ticked, the user has access to the administrator section of eRequest and can run Management Studio. The user can still enter requests etc
Options and User Licencing
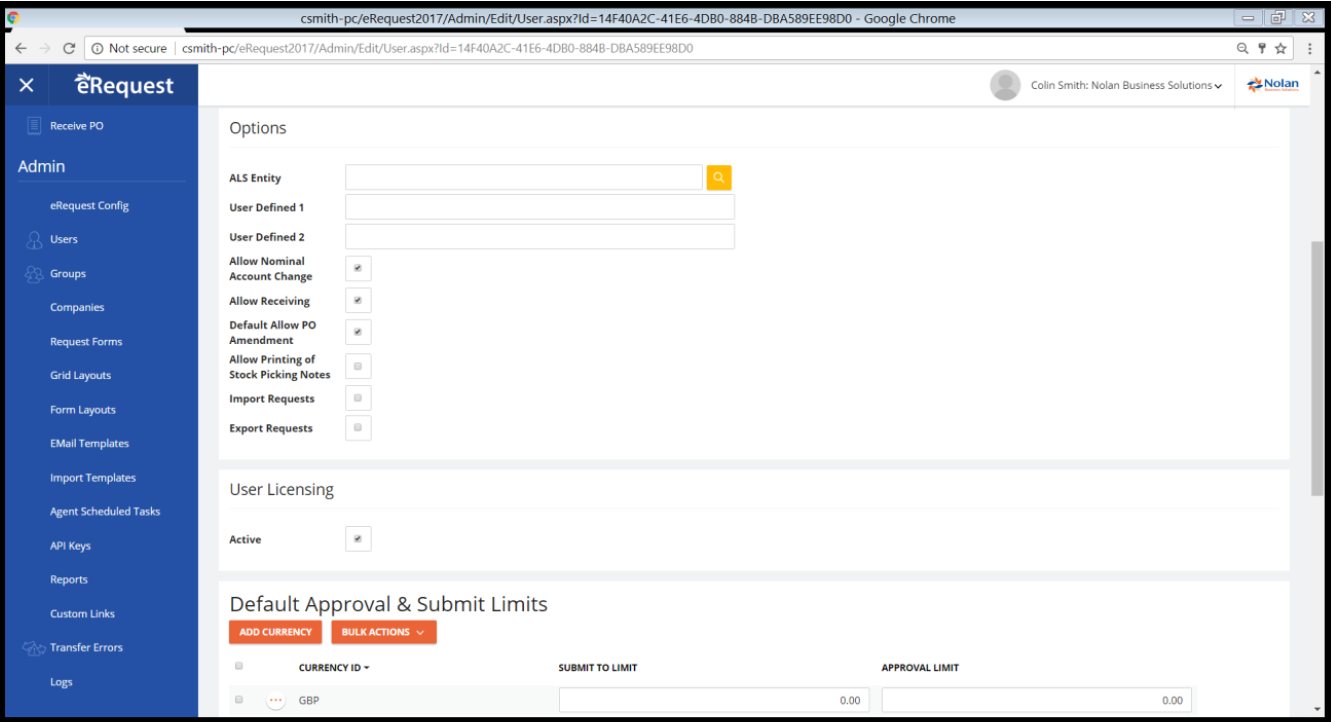
ALS Entity – (Account Level Security) This is a Dynamics GP security feature which controls access to Account Numbers. See the Dynamics GP documentation for details, and the later section on Account Level Security within this document.
User-defined 1 and 2 – User defined text related to this user
Allow Nominal Account Change – When ticked, allows this user to alter the Account which is defaulted for a Request Line.
Allow Receiving – When ticked, the user will be able to enter receipts against their Purchase Orders
Default Allow PO Amendment – PO Amendment is the process of recalling a Request which has been transferred to Purchase Order. This option enables/disables this functionality. NOTE: This is only the default for when this user is assigned to a request form, the effective setting is on the Request Form User.
Allow Printing of Stock Picking Note – Allows this user to Print the Picking Note for IV Stock type Requests, also allows access to the Picking Note Fulfillment page.
User Licensing
This flag indicates the user is active, only active users can log in to eRequest. Active users contribute to the number of registered users. Eg. If you have 11 users marked as active, but your registration keys are only for 10 users. No-one will be able to log into eRequest until you have disabled one of your users.
Default Approval & Submit Limits
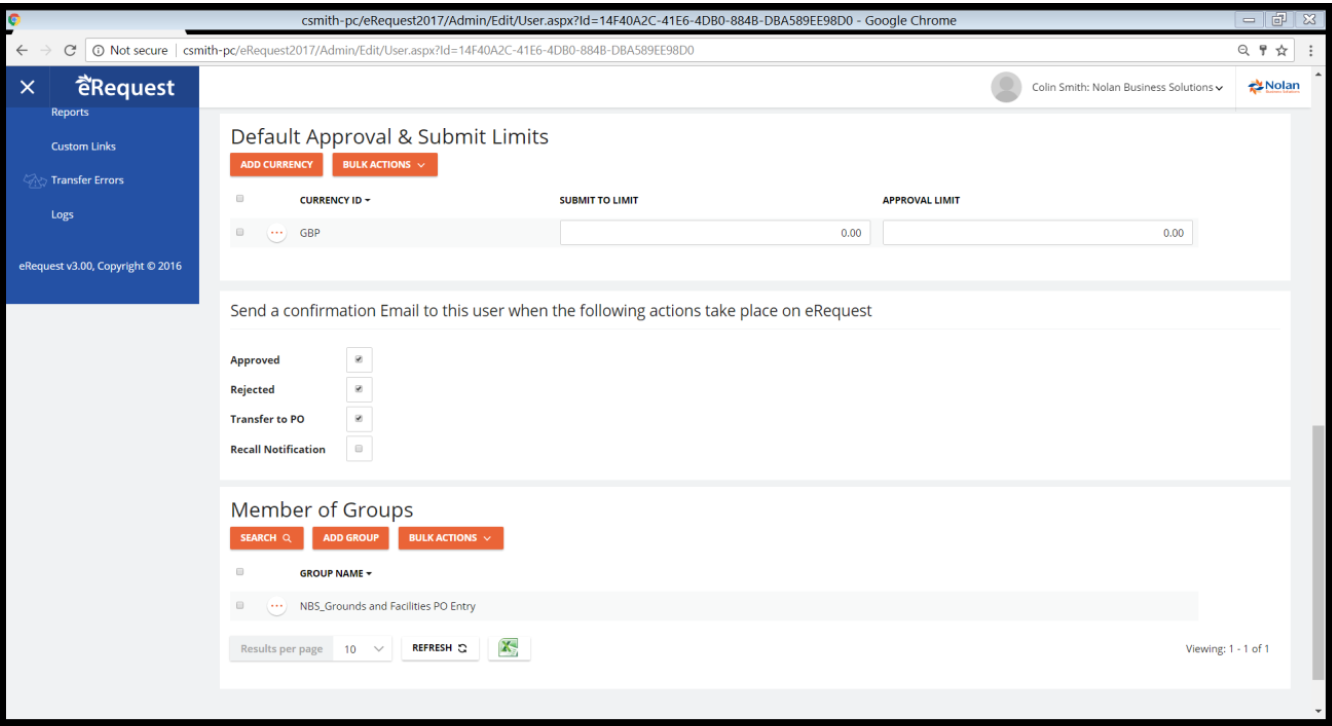
Currency limits for ‘Submit to’ and ‘Approval’
Default to ‘Submit To’ limit: Within eRequest a request must be ‘Approved’ before it is considered complete and made available for transfer to Dynamics GP. Users can submit their requests to another user within their user’s parent group (See group hierarchy) for approval. This field limits the value of requests which can be ‘Submitted to’ this user. A value of 0 indicates no limit.
NOTE: This is only a default value and will be used to default this value when this user is assigned to a Request Form.
Default ‘Approval Limit’: This limits the value of a request this user can ‘Approve’. A value of 0 indicates this user cannot approve requests.
NOTE: This is only a default value and will be used to default this value when the user is assigned to a Request Form.
Both the above limits are defined per Currency, if you do not have Currencies setup within GP. There is a ‘GENERIC’ currency which is always available, where no currency is specified on the request, the limits defined against this will be used.
If a User doesn’t have limits defined for a specific Currency, requests in that currency cannot be Submitted to them, and they cannot Approve a request in that currency.
Approved, Rejected and Transferred to PO, Recall Notifications
When ticked, this user will receive an informative email when a requests originated by them have the appropriate process performed on it.
User Group Hierarchy
Expand the Groups Section, this section is used to maintain the eRequest User Group Hierarchy. Each eRequest user can belong to one or many groups. The groups are arranging in a parent child hierarchy e.g. Each group has 1 parent and 0 or many child groups. Except for the top level group(s) which has no parent group.
When a user submits a request for ‘Approval’ they can select a user from their group’s parent group. E.g. If the groups were setup as in the screen shot, a user in ‘Standard Requestors’ group can submit a request to users in the ‘Department Management’ Group. This user could then ‘Approve’ the request if it was within their ‘Approval Limit’ or submit the request further up the tree to a user in the ‘Purchase Managers’ group.
The Group structure also controls visibility of requests. A user can only see requests created by a user in the same group as them or by a user in a group lower in the tree structure. In this way a member of the top group and see all requests created by all users.
NOTE: All users must belong to at least 1 group before they can login.
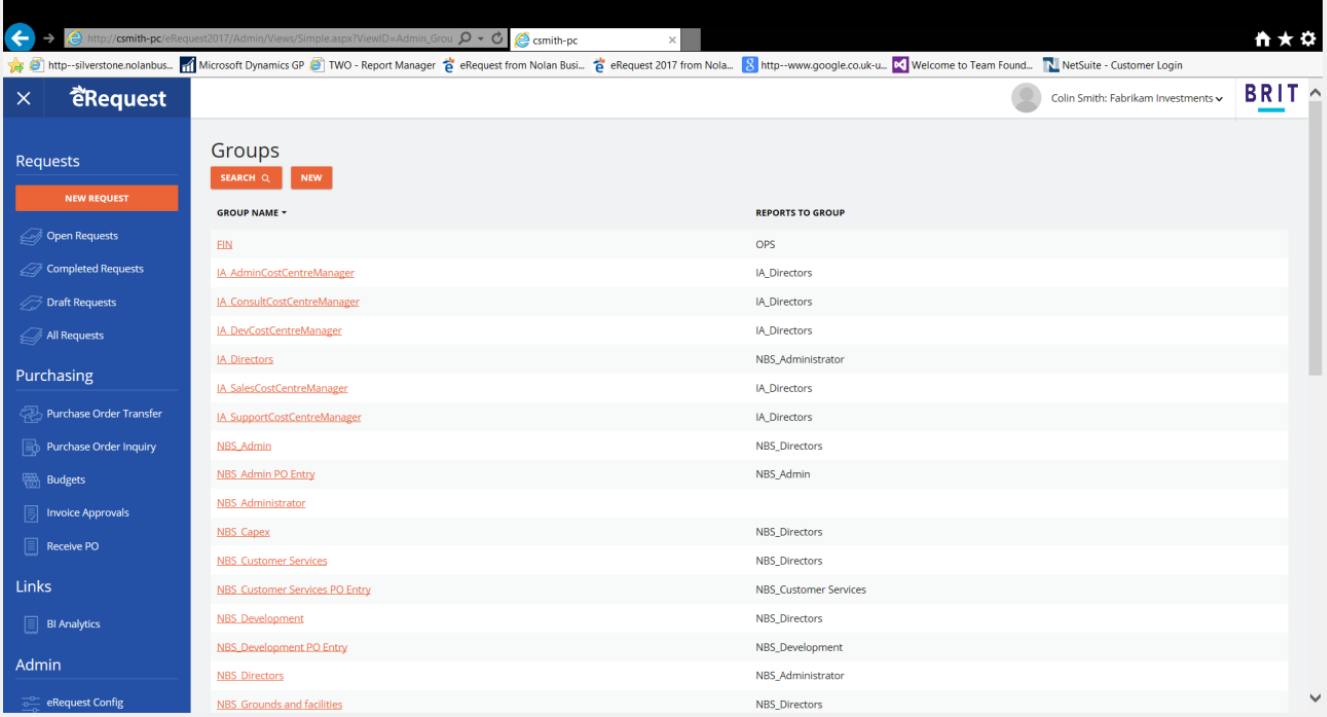
To create new groups, select ‘New’. If you have no groups the first group you create must be the top level group.
To delete groups, right-click on the group and select ‘Delete Group’. If you attempt to delete groups which have child groups below them, you must select what to do with the child groups.
To edit an existing group click on it.
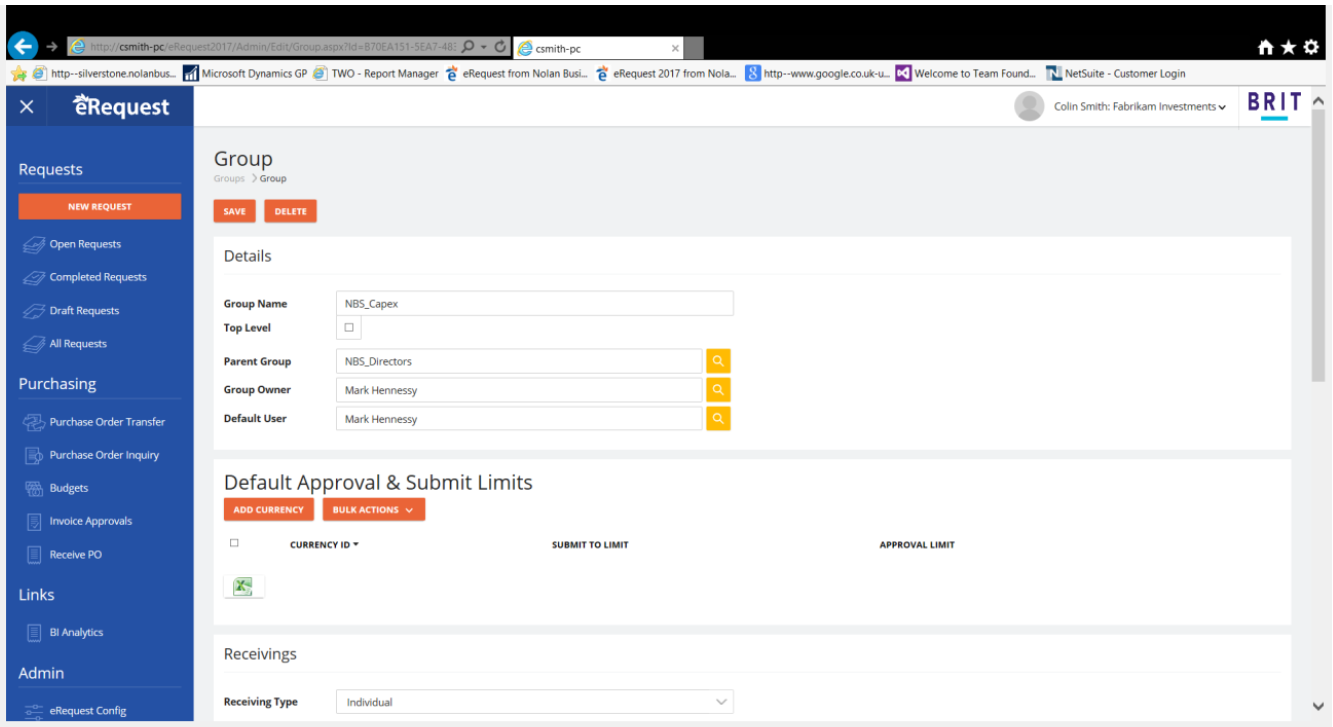
Group Name – Enter the Name of the group here
Top Level Group – This indicates this is the ‘Top level’ group. A top level group cannot have any parent groups.
Parent Group – Select a group, this is the parent of this group; if this isn’t the ‘Top Level’ group you must select a parent. Be careful not to setup a looping hierarchy.
Default User – Select a user from the list of users assigned to this group. When requests are ‘Submitted to’ this group, this will be the default user to send them to.
Group Owner – This is the user who owns the group
Request Submit and Approval Limits – By checking this tickbox, Group level Submit to and Approval Limits will be activated. Where a user has specific Submit to and Approval Limits, these will be used when evaluating the limits that the user has when a request is submitted or approval required however, if no limits are specified at user level the group submit to and approval values will be used.
Default to ‘Submit To’ limit: Within eRequest a request must be ‘Approved’ before it is considered complete and made available for transfer to Dynamics GP. This field limits the value of requests which can be ‘Submitted to’ this group. A value of 0 indicates no limit.
Default ‘Approval Limit’: This limits the value of a request this group can ‘Approve’. A value of 0 indicates this group cannot approve requests.
Receivings – The receiving type can be set to either individual or group. If the receiving type is set to individual, only the user who originated the request may receive the goods using the Receiving functionality. If the receiving type is set to group, then any user assigned to the group may receive the goods using the Receiving functionality.
Invoice Approvals – If the group of users is used for invoice approval, the options here define the number of users in the group that are required to approve an invoice, the value, below which, when the required number of users have given their approval constitutes complete approval and if the value of the invoice is above the value specified, who the invoice is then sent to for approval. See the section on Invoice Approvals.
To Add and Remove users from the Group, select the Add User or Remove User button under the bulk actions.
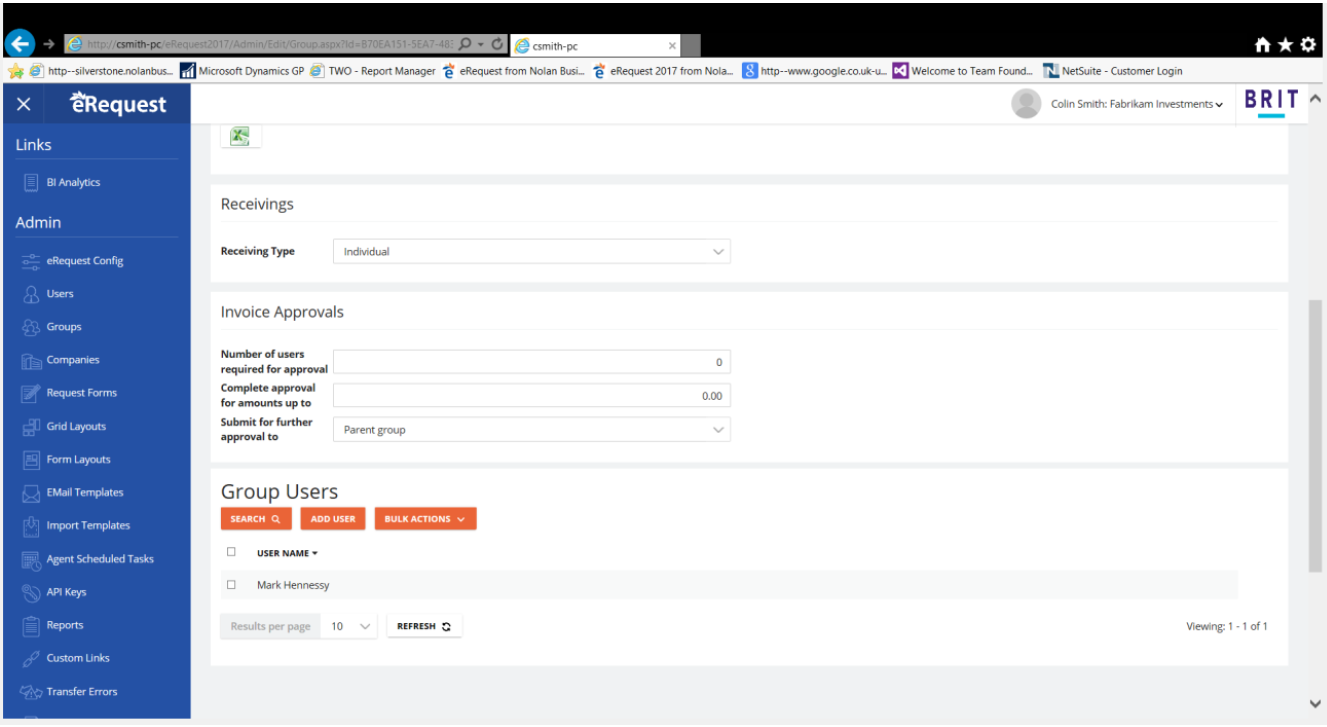
Add User – Click to assign users to this group. Multiple users can be selected using Shift and Control keys.
Remove User – Select a user from the Assigned user and click this button to remove them from the group. Multiple users can be selected using Shift and Control keys.
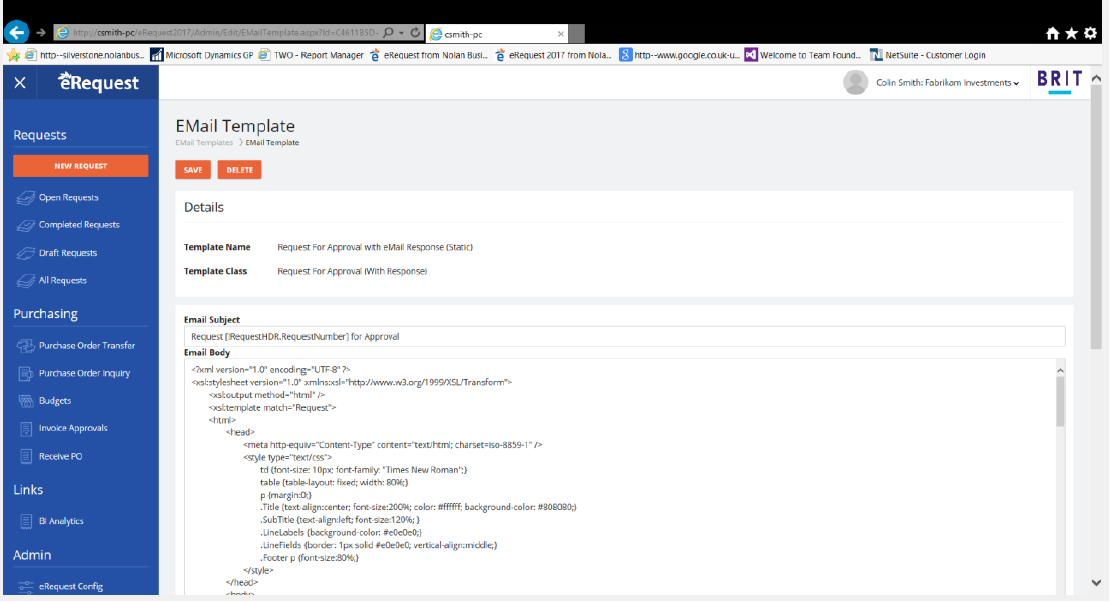
Email Templates
Email Templates can be defined which can then be used on different request forms. The templates and be edited and fields from the Request HDR can be inserted into the eMails.
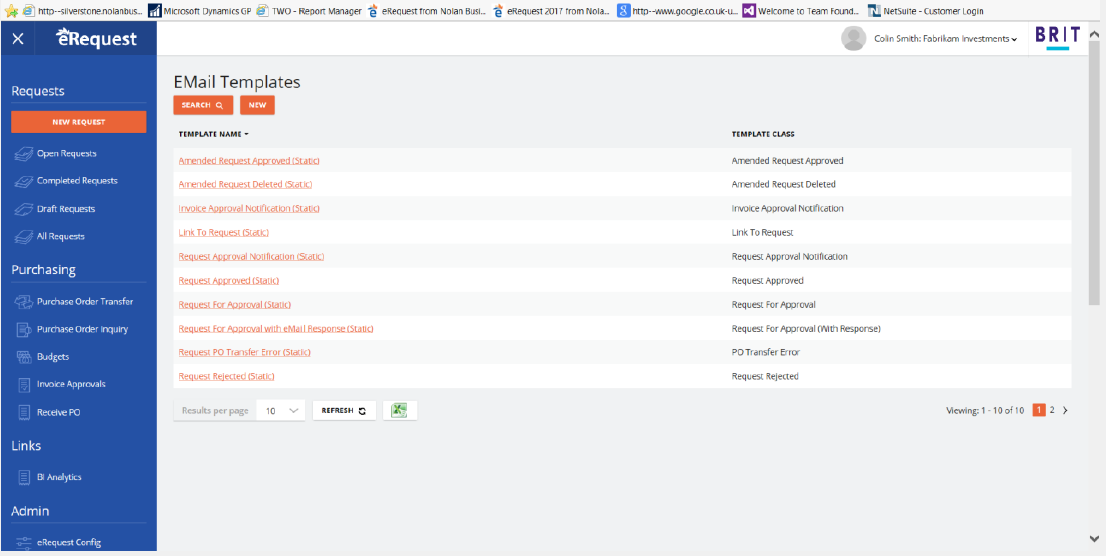
There are several different emails which eRequest can send each of these is defined as a Template Class. When defining an Email Template you select which Template class it is for, this dictates where that Template can be used.
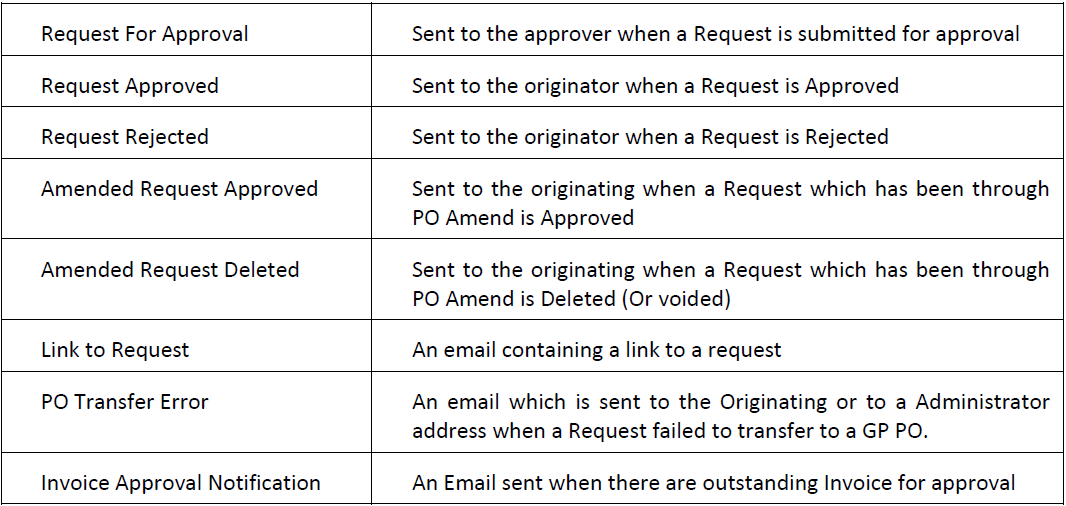
The Classes are:
Tag can be inserted into the Email Template, Subject and Body text which will be replaced by values from the request. The format of the tags is:
[!ObjectName.PropertyName]
The tag should start with [! And end with ]
The tag should contain the object name followed by ‘.’ And the property name
Objects available are listed below. Look at the columns in the table for the available properties
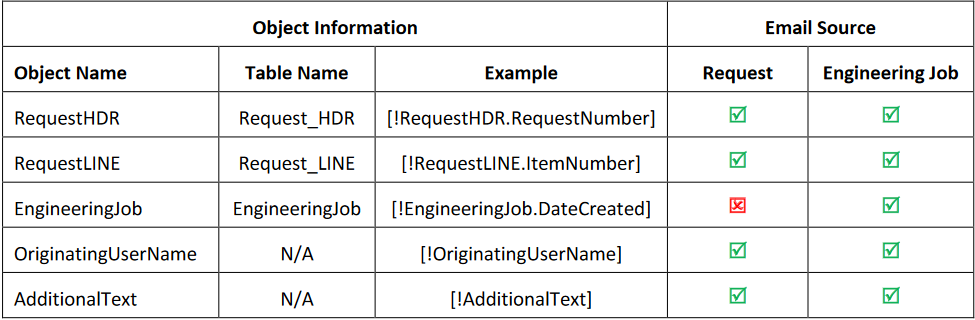
Please see the Static templates, eRequest is installed with, to see examples of its use.
Grid Layouts
Each view and lookup in the product can be customized. The columns can be reorder and the columns widths edited.
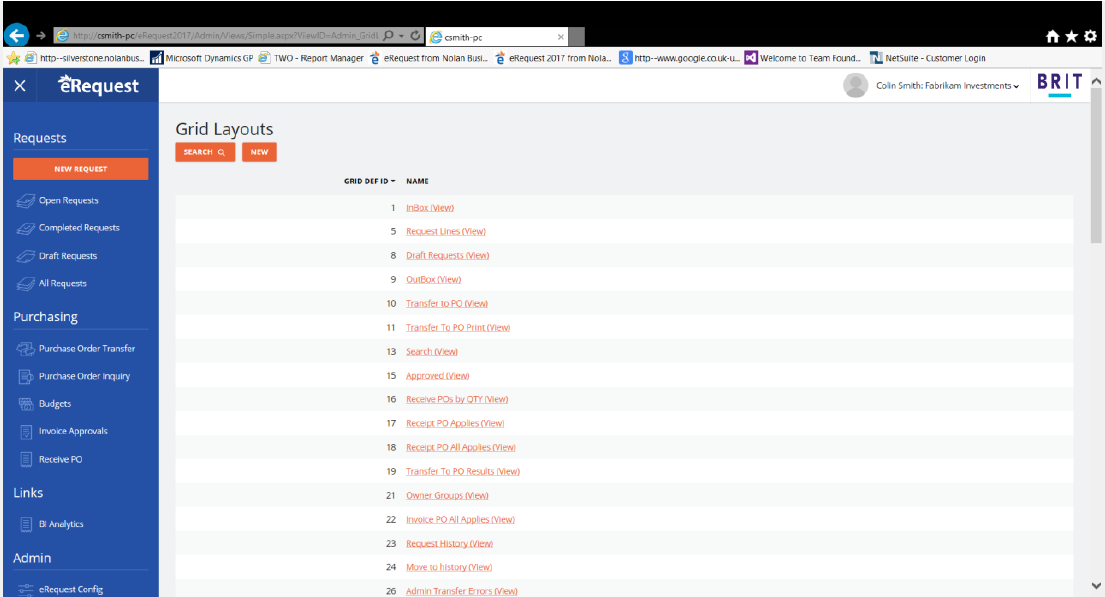
Save – Saves the layout of the grid
Add Column – Drag the column to the Grid Layout, only predefined columns can be added to the Grid, most default layouts already have all the available columns in the layout.
Remove Column – Removes the currently selected column from the layout, you can add the column back by using the Add Column button. Not all columns can be removed from the Grids, some columns are required, these are generally columns with editable values. The must always be at least 1 column in a layout.
Default Layout – This will set the layout back to the default.
Column widths can be changed by dragging the divider between columns
Columns can be rearranged by dragging the column heading, between 2 other headings.
Change Log
The Change Log keeps a record of who logs in and out of Management Studio. It also logs changes to Users, Request Forms and Request Form Users.
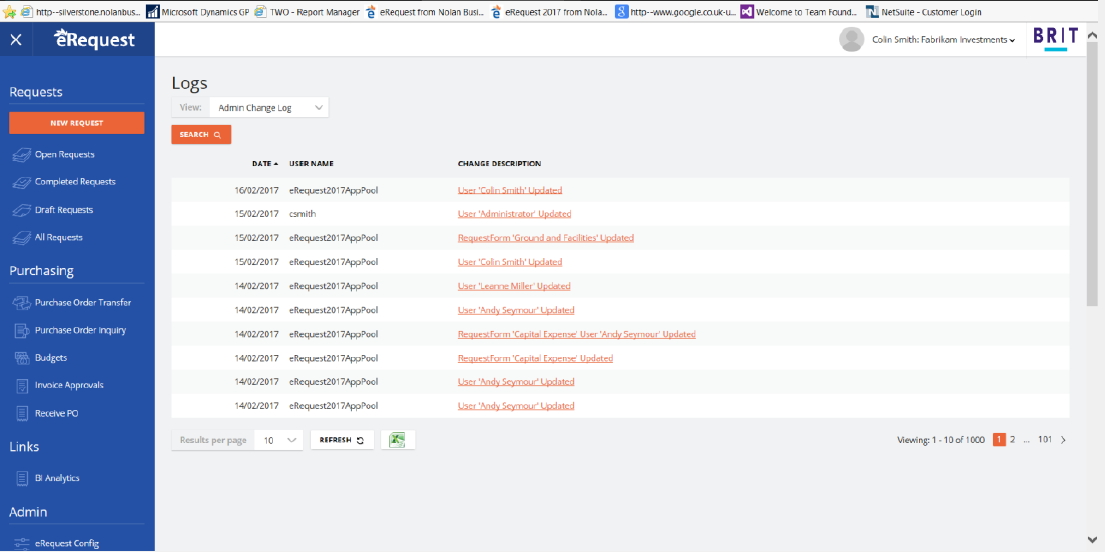
Clear Down – The current entries will cleared from the log
Application Error Log
The Application Error Log maintains a record of any errors which the eRequest Website has encountered. When the Website encounters an error, the user is shown a screen which indicates there was an error but doesn’t show any detail of the error.
To find the detail of the error, locate the appropriate row in this view and double click it to see the detail.
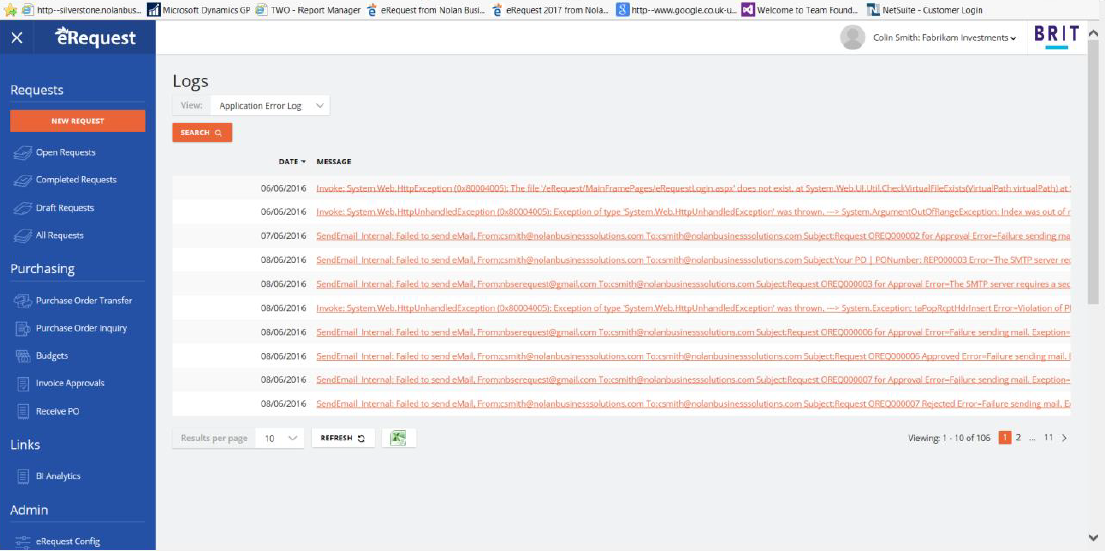
Clear Down – The current entries will cleared from the log
Agent Tasks
The eRequest Agent runs as a background process and can run several different tasks, you can create a new tasks of the supported types, and schedule these to run.
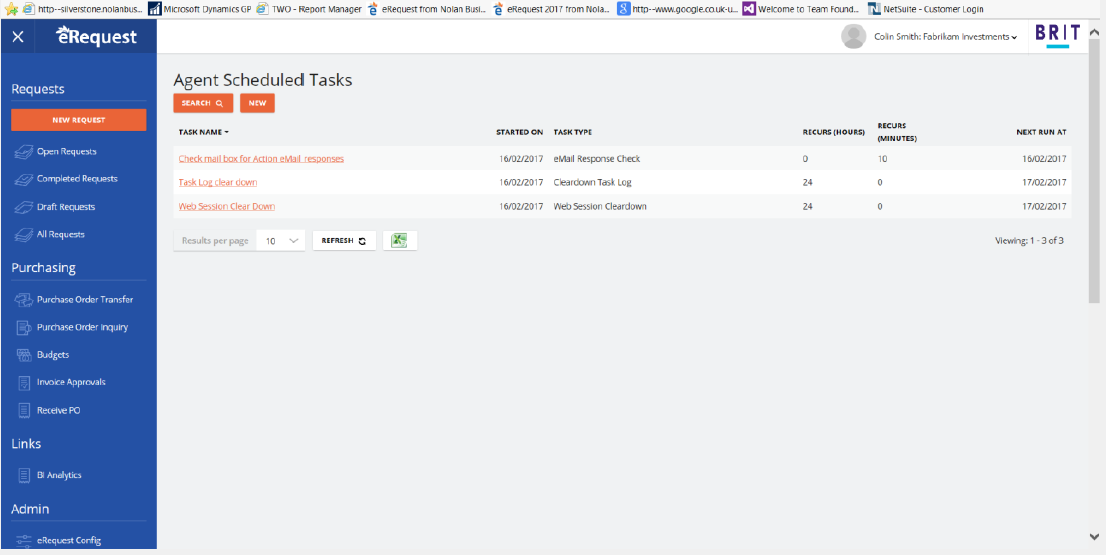
Scheduled Task – This lists the tasks which run on a Schedule basis, double click on a task to edit its options and set the schedule
Task Log – All tasks which are performed, create an entry in the log, you can double click on the task to get a summary of the outcome of the task.
New Task Type – To create new tasks, select the task type, and click on the ‘New Task’ button.
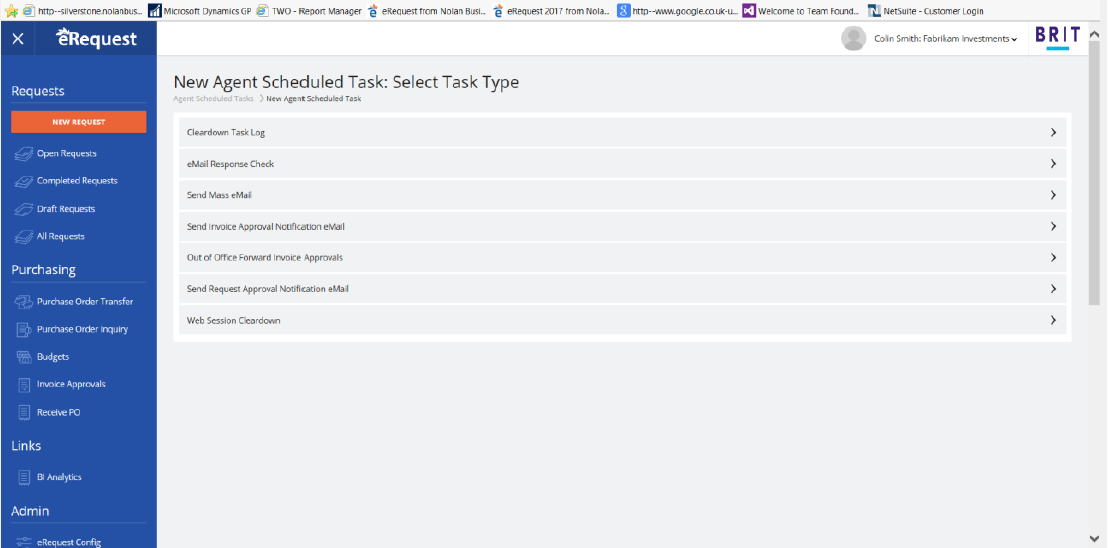
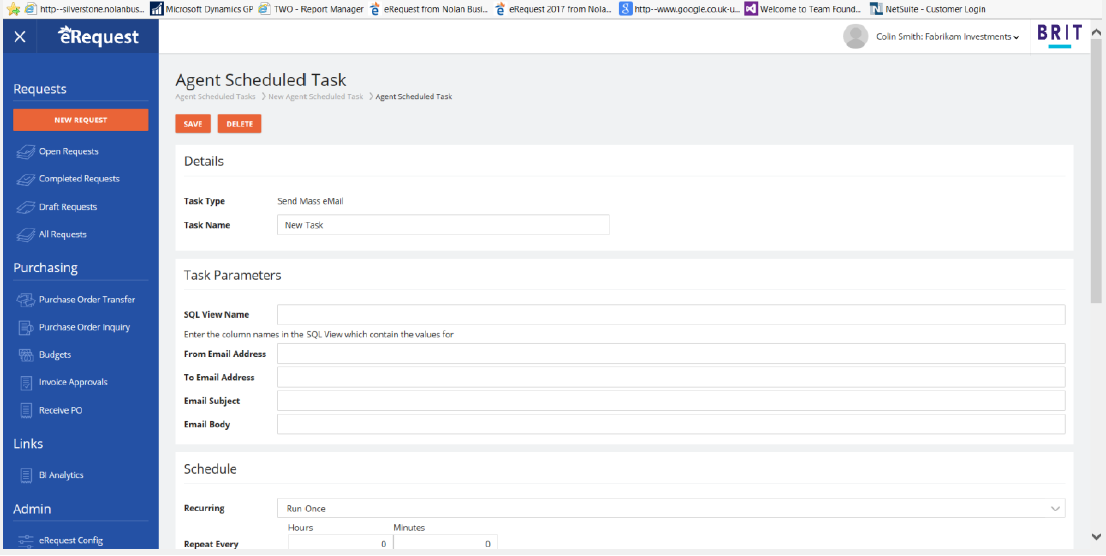
Enter the ‘Task Name’ and fill in the options for the task, these are different for each task. Setup a schedule for the task, if no schedule is created, the task is considered a ‘one off’ task and will be run as soon as possible.
The agent can perform multiple tasks are the same time, but there are limits on resources, tasks will be performed as soon as possible.
Reports
Reports contain all the report definitions in eRequest, a default report is provided for Purchase Orders and Requests. Double click on the report to edit them.
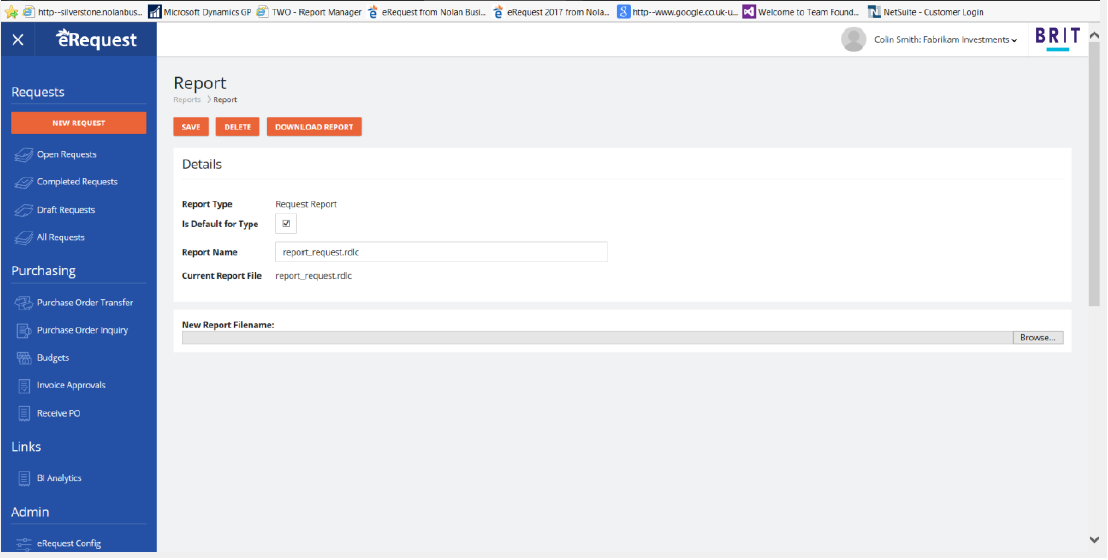
When creating a new report definition you will be required to select which type of Report you are adding.
Report Type – 2 Options are available, PO Report and Request Report
Is Default for Type – At least 1 report for each Type must be marked as default. The Default report will automatically be selected when new Request Forms are created
Report Name – This will default to the Filename of the imported file, but can be changed to a more descriptive name.
Filename – This is the filename of the Report definition file. The definition files are stored in the eRequest database, to edit the definition you must download it to your machine, once modified it you can upload it back to eRequest. Using the ‘Upload Report File’ and ‘Download Report File’ buttons.
You can edit the files using any compatible report designer which can edit ‘rdlc’ files. We recommend using Microsoft Visual Studio 2010
NOTE: There are also freeware and packages available which can also edit a RDLC file, as long as they support the format these can also be used to edit the report layouts.
NOTE: If you are upgrading from a previous version of eRequest, the upgrade will automatically create and upload all your existing PO Report definition files which have been used on the Request Forms. The original directory in WebSite/Reports/ will be rename to WebSite/_OldReports these files should not be edited anymore. The Report Definition should always be download from eRequest, edited and then uploaded again.
Import Templates
Import templates define how to import a CSV (Comma Separated Values) File to eRequest as a Request.
The template allows you to define the File Sources, convert these to datasets, and combine the datasets using a Relationship hierarchy to a ‘Header and Detail’ style records, the columns can then be mapped to Request Header and Lines fields. Functions can be used in the mappings to translate the field values.
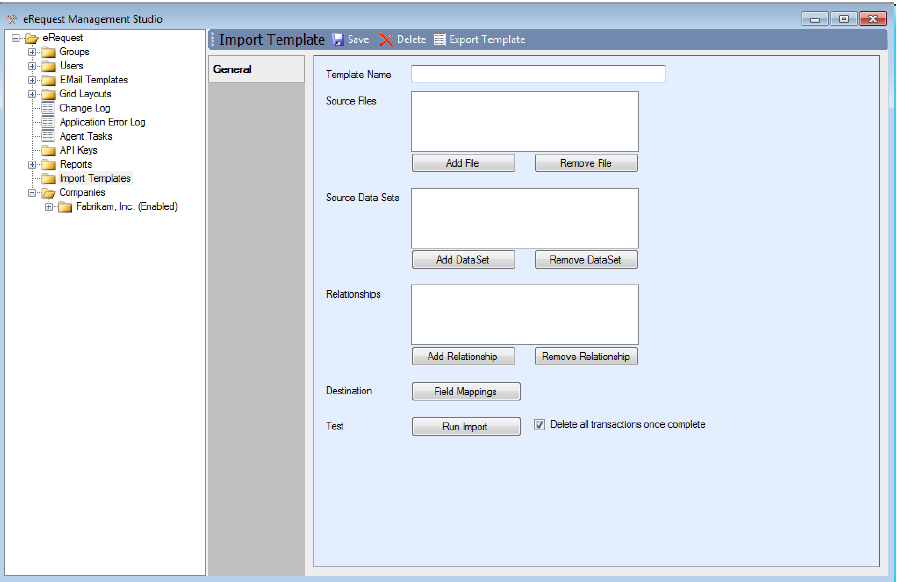
Template Name – Enter a name which can identify the Template
Source Files – Use the ‘Add File’ and ‘Remove File’ buttons to Add and Remove files from the list. A Source file definition stores the columns definitions from the CSV files, and how to translate the text in the file to the correct data types for the data. Eg. The translation of the text in the file to a date using a format string. The correct data types are important so the records can be Sorted and Grouped, also so the mapping of the values to the eRequest fields are handled correctly.
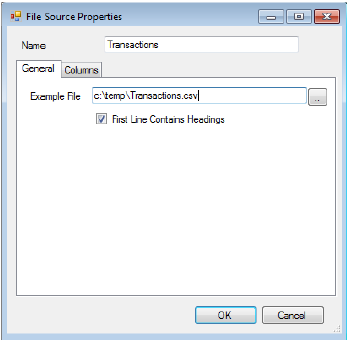
Select an Example File, the file must be a text file in CSV (Comer Separate Values) format. With Quote or Double Quote field delimiters and Carriage Return, Line Feed Line Delimiters (Eg. Standard PC Text File)
With ‘First Line Contains Headers’ ticked the Columns will be named based on the values in the first line of the CSV file, if unticked generic Column names will be generated.
The ‘Columns’ tab show the columns.
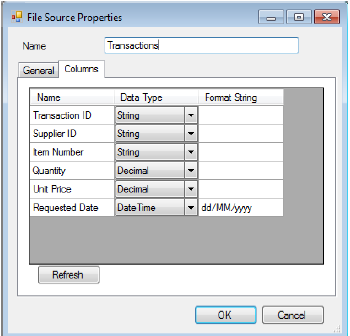
The grid shows the column names, the data types default to ‘String’ eg. simple text. When the value should be interpreted as a different datatype, change the Drop Down to the correct type. For Date, Time and DateTime Datatypes, you must enter a Formatting String to control how the value is converted.
dd- Days
MM- Month
yyyy- Year
hh – Hours
mm – Minutes
ss – Seconds
Source Data Sets – Use the ‘Add DataSet’ and ‘Remove DataSet’ buttons to Add and Remove dataset definitions from the list. A data set is based on a file source, the data set allows the data to be sorted and grouped by specific columns. 2 Data sets need to be defined one for the header with 1 record per request header, and one for the lines with 1 record per request line.
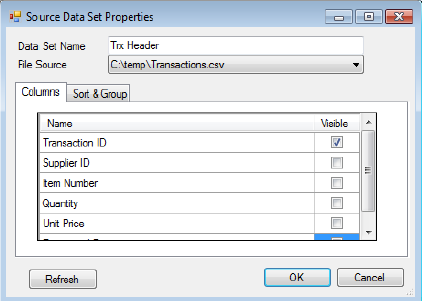
Enter a Data Set name to identify this Data Set definition.
Select the ‘File Source’ to use for this data set, once selected the ‘Column’ will be shown in the grid below. To make Columns visible in this data set ‘tick/untick’ the Visible Check Box.
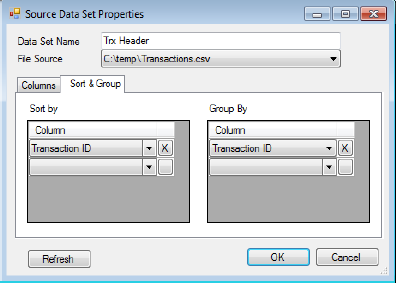
The ‘Sort & Group’ tab controls how the data is processed. If you are creating a Data Set for the Header rows, you need to sort and group the data records from the CSV so that there is 1 record in the data set for each Request Header. NOTE: the Group By Columns must be a subset of the SortBy columns in the same order.
Eg. if you Sort by columns ‘Transaction ID’ and ‘Supplier ID’, the group by columns can only be ‘Transaction ID’ and ‘Supplier ID’ or just ‘Transaction ID’.
Relationships – Use the ‘Add Relationship’ and ‘Remove Relationship’ buttons to Add and Remove relationship definitions from the list. A relationship definition describes how the Header and Line datasets should be joined together, eg. Which column links the header with the lines.

Select the Parent Data Set, and Child Data Set (Header and Lines) from the Dropdown Lists.
Then in the Grid define how the 2 should be joined together, by entering 1 or more, Parent and Child Columns.
Field Mappings – Opens the field mapping dialog, the destination request document shows in a tree in the main part of the window, the fields listed first are the available header fields, under the RequestLines node the fields which relate to the request lines.
The Request Header and Request Lines will automatically be mapped to the 2 datasets using the relationship you have defined.
For each field you can define a field mapping. A Constant value can be used, a field from the source data sets can be used, or a function can be written which can retrieve multiple source field values, perform some logic and return a value which is used as the final destination field value.
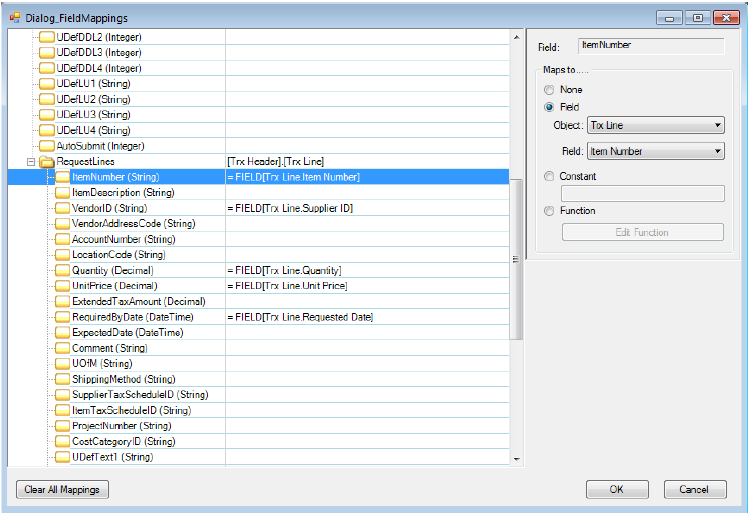
NOTE: The functions are written in C#, the data type of the returned value should be correct for the destination field.
Run Import – Allows you to run an import from Management Studio to test the import. With the ‘Delete all transactions once complete’ ticked the requests will be created but then deleted again after would so there is no impact on the request data.
NOTE: the example files selected in the ‘Source File’ definition will be used as the source for the test.
Any errors will be reported.
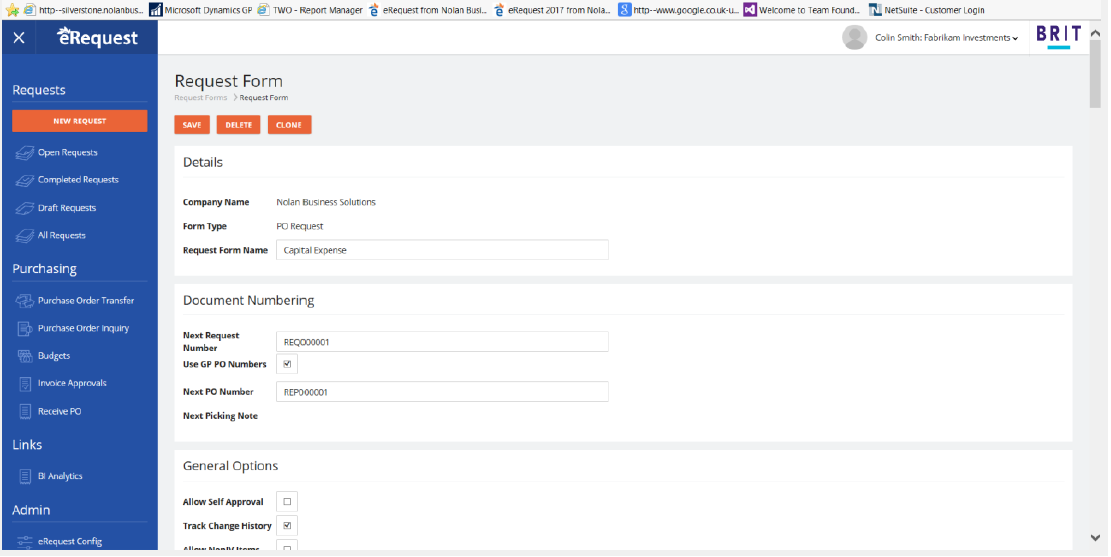
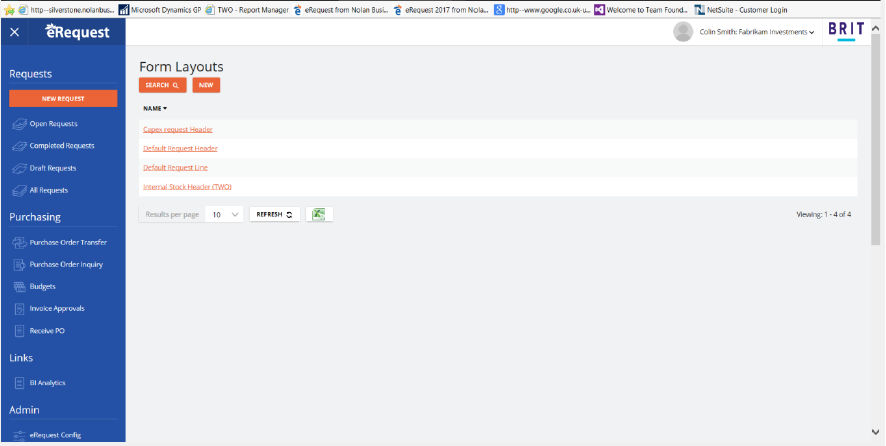
Request Forms
Each request entered into eRequest must be based on a Request form. This form is a template for the request. The forms can be used to Hide/Show and rename Fields, change the required fields for ‘submission’ and ‘approval’ processes and control the users’ limits on approving. Each company has its own request forms associated with it.
There are two types of Request Forms, PO Requests and Stock Requests. Requests based on either form go through the same Submit Approve process, and are handled in a similar way. The two form types have different fields available on the requests, and the Stock Request are not subject to Submit and Approval limits since they have no Value, they are just a stock movement.
PO Request create Purchase Orders in GP, and Stock Requests create a decrementing Stock Transaction. When you create a new request form you will select which for type you are using, this cannot be changed after the record is created.
To create a new ‘Request Form’ click on the New button
To delete a ‘Request Form’ select a request form and press the Delete button
To edit an existing ‘Request Form’ click on it.
Request Form Name – The name of this ‘Request Form’
Next Request Number – The ‘Request Number’ to use on the next Request created based on this ‘Request Form’. This should be in the form of letters followed by numbers. eRequest will increment the number part as each number is used up.
Email Templates – Select an Email template to use for each of the Email Classes, for requests based on this Request Form.
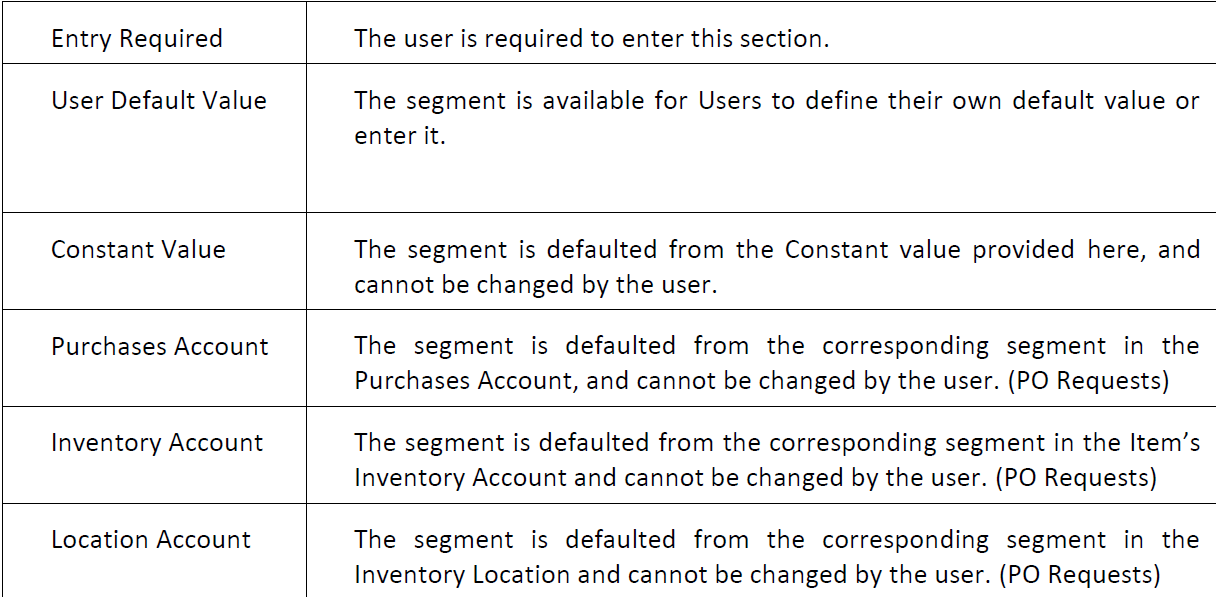
Account Segment Options – The Account Segment Options control how Account Number Segments are defaulted when a new Request Line is entered. Options available are:

Request Form Options (PO Requests)
Use Dynamics GP Next PO – With this option is enabled the ‘Next PO Number’ is not used instead the ‘PO Number’ on new PO’s will be retrieved from Dynamics GP.
Next PO Number – The ‘PO Number’ to use on the next Purchase Order created. This should be in the form of a number of letters followed by a number of numbers. eRequest will increment the number part when each number is used up. This number is ignored if using the GP PO Number range.
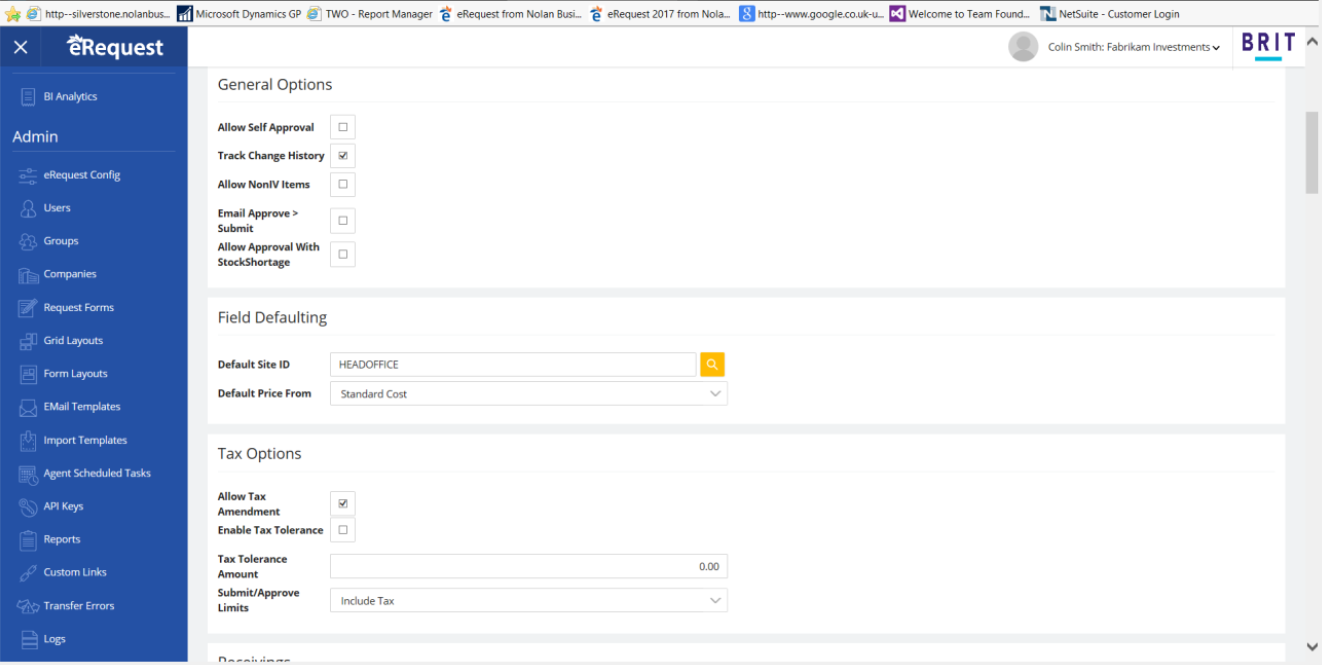
Allow Self Approval – When enabled requests based on this ‘Request Form’ can be ‘Approved’ by any user with access to it, without being required to submit them to a user in the parent group. NOTE: Users can still only ‘Approve’ a request with a value less than or equal to the user’s ‘Approval Limit’ on this ‘Request Form’
Track Change History – When enabled, a history of the updates and changed to a request are stored and can be viewed from the ‘History’ button on a request
Allow NonIV Items – When this option is enabled, you can get Non Inventory items into eRequest. The normal Item Number lookup field will be free text and any item number can be entered. When the PO is created in GP it will be treated as a ‘Non Inventory’ item.
Email Approve > Submit - If this is checked then approvals done by email that would normally fail due to the amount being over the approvers limit, will instead be submitted to the default user in the parent group.
Background Colour – Select a colour to use as the background on Requests based on this ‘Request Form’, this can be used as a visual indicator of which ‘Request Form’ is being used.
Default Site ID – As the site may be set as not required in eRequest but is a required field in GP, you may enter a default Site ID in this field.
Default Price From – This indicates which value to default the ‘Unit Price’ on a Request line when it is first entered, these values are read from the Item card with-in Dynamics GP.
Account No. Defaulting – This option control when the Account Number on the Request Line entry page will be defaulted.
With this set to ‘When Empty’ the account number will only be defaulted when it hasn’t already been selected. Once the Account Number has, defaulted successfully or has been selected using the lookup. It will not be defaulted by changes to fields such as Item Number etc.
With this set to ‘Always’ the account number will always be defaulted when ‘Item Number’, ‘Vendor ID’ or ‘Location Code’ fields change. If the account number has segments which come from these items the existing segments plus the new segment from the newly selected field will be used to find a new account number, if it is a valid combination the account number will be defaulted, otherwise the account number will be cleared and will require a manual lookup.
Allow Tax Amendment – This option allows the administrator to select whether Calculated tax Amount are available to be modified by the users whilst entering requests.
Enable Tax Tolerance & Tax Tolerance Amount – When enabled, the Tax amount entered on a Request is checked against the calculated Tax Amount. If there is a difference bigger than the tolerance entered here the user is given an error message.
Show Receive All Button – This option shows/hides the ‘Receive All’ button on the PO Receiving view.
Receive PO Lines – This option controls how eRequest does PO Receiving.
‘by Qty’ by Quantity is the normal was it which GP does receiving, a Qty is entered and a Shipment Receipt is created for that amount.
‘by Value’ with this option set, if part of a full value if received, the PO Line in GP is cancelled, and 2 new lines are created one for the value entered and one for the remaining amount from the original line. The line for the amount received is then matched against the receipt created.
Budget Account Segment Options – This section controls which accounts are queried to display the Budget Overview and Budget Account Detail screens. For each account segment the display can be limited, to a specific range of values, to a filter (e.g. Like 45_5 would match 4505, 4515, 4525, etc.) or to a single value entered by the user in their User Preferences (if the segment is set to User Default Value in the Account Segment Options).
Request Form Options (Stock Requests)
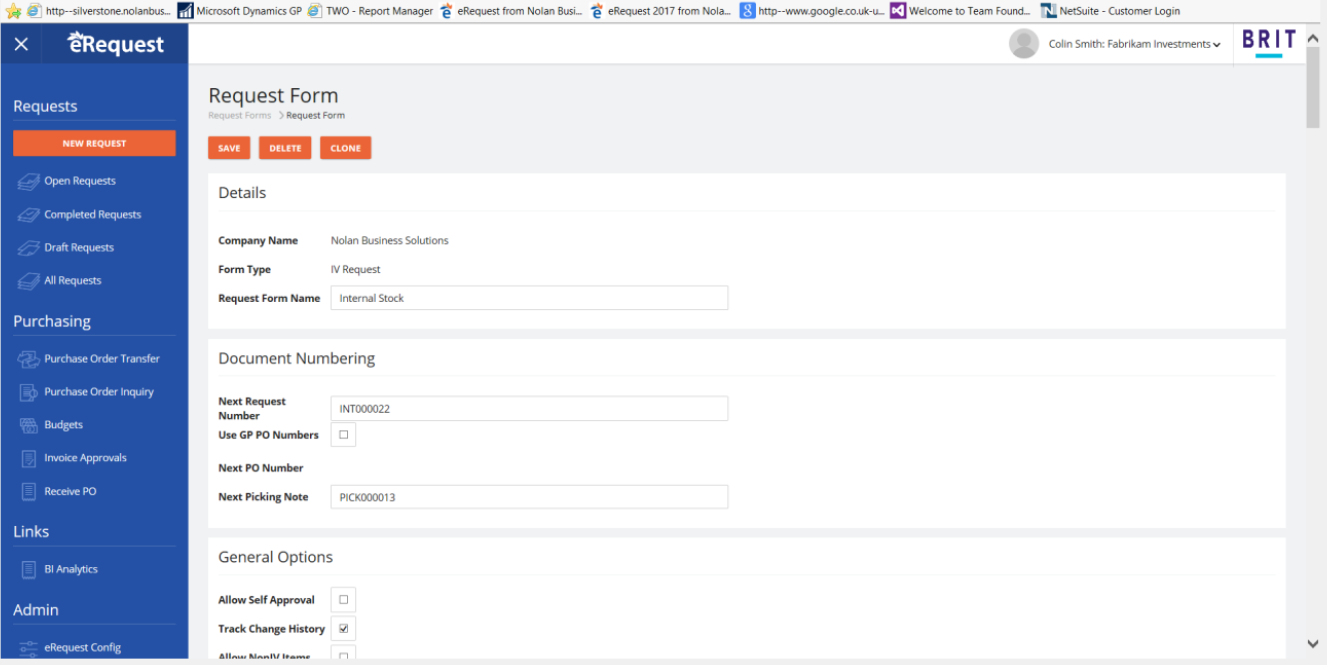
Allow Self Approval – When enabled requests based on this ‘Request Form’ can be ‘Approved’ by any user with access to it, without being required to submit them to a user in the parent group. NOTE: Users can still only ‘Approve’ a request with a value less than or equal to the user’s ‘Approval Limit’ on this ‘Request Form’
Track Change History – When enabled, a history of the updates and changed to a request are stored and can be viewed from the ‘History’ button on a request
Background Colour – Select a colour to use as the background on Requests based on this ‘Request Form’, this can be used as a visual indicator of which ‘Request Form’ is being used.
Next Picking Note Number – The next picking note number to assign, This should be in the form of a number of letters followed by a number of numbers. eRequest will increment the number part when each number is used up. This number is ignored if using the GP PO Number range.
Allow Approval With Stock Shortage – Normally a Request cannot be Submitted or Approved when there is not enough stock available, with this option ticked you can override this behaviour.
Assigning Users to a Request Form
With a Request Form selected, click on the ‘Assigned Users’ tab.
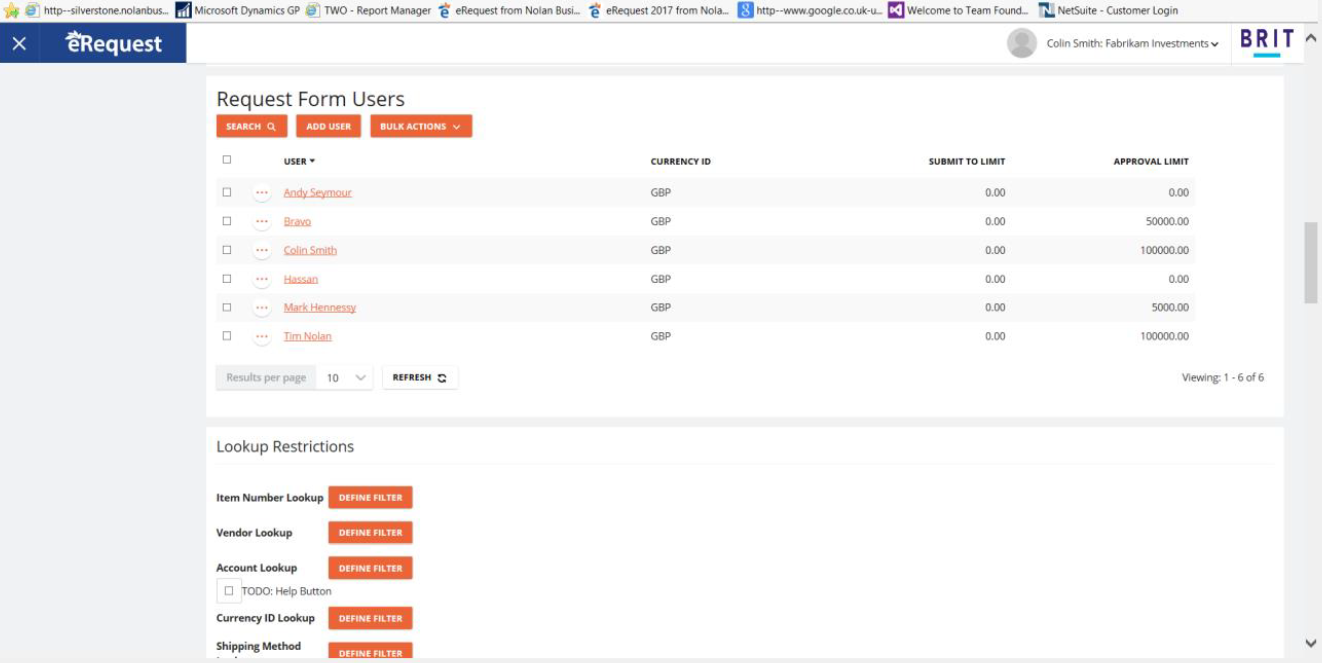
To assign a user to this ‘Request Form’ click the ‘Add User’ button and select a user. Multiple users can be selected using Shift and Control keys.
To remove users from this ‘Request Form’ select the user in the grid and click on the ‘Remove User’ button.
To edit the ‘Submit to Limit’ and ‘Approval Limit’ for a user on this ‘Request Form’ double click on the user in the grid.
Details Tab
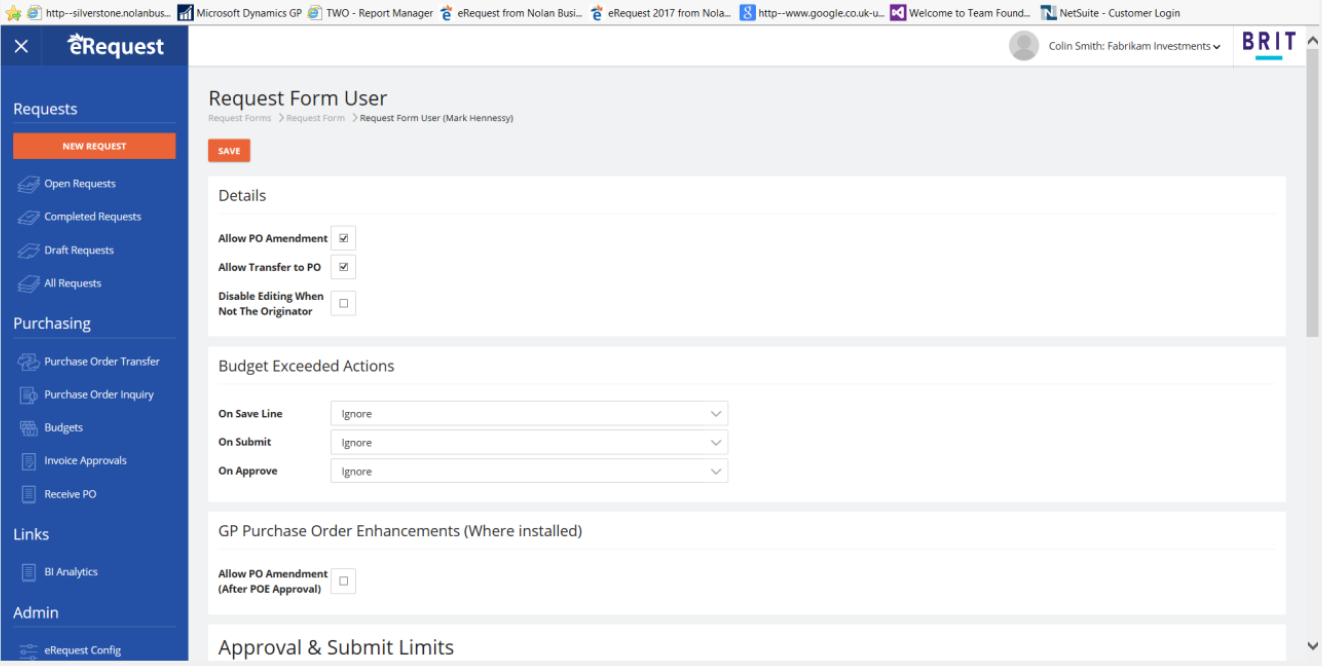
Allow PO Amendment – If this option is selected, the users will be able to amend purchase orders after they have been approved and submitted to Purchase Order in Dynamics GP. Only Purchase Order lines that have not been shipped or invoiced may be amended. (PO Requests Only)
Allow Transfer to PO – This defines whether the user is allowed to transfer requests entered on this request form to Purchase Order. (PO Requests Only)
Import/Export Request – This defines whether the import and export buttons are displayed allowing the users to import requests from third party systems or export to text files.
Budget Exceeded Actions – These actions define the level of commitment processing applied for this user for this type of request. These actions occur on Save Line, on submit and on Approve. The choice is for the module to ignore the commitment failures or to display is as an error.
Allow PO Amendment – (After POE Approval) POE is an additional module in GP, it supports Approval of the PO in GP. If this option is selected, the users will be able to amend purchase orders after they have been approved and submitted to Purchase Order in Dynamics GP and then approved by POE. Only Purchase Order lines that have not been shipped or invoiced may be amended. (PO Requests Only)
Currency limits for ‘Submit to’ and ‘Approval’ – ‘Submit To’ limit: Within eRequest a request must be ‘Approved’ before it is considered complete and made available for transfer to Dynamics GP. Users can submit their requests to another user within their user’s parent group (See group hierarchy) for approval. This field limits the value of requests which can be ‘Submitted to’ this user. A value of 0 indicates not limit.
‘Approval Limit’ This limits the value of a request this user can ‘Approve’. A value of 0 indicates a user cannot approve requests.
Both the above limits are defined per Currency, if you do not have Currencies setup within GP. There is a ‘GENERIC’ currency which is always available, where no currency is specified on the request, the limits defined against this will be used.
If a User doesn’t have limits defined for a specific Currency, requests in that currency cannot Submitted to them, and they cannot Approve a request in that currency.
User Preferences Tab
This tab allows an administrator to edit the users preference on this request form. The default values for Account segments and their User Status can be edited.
User Field Defaults
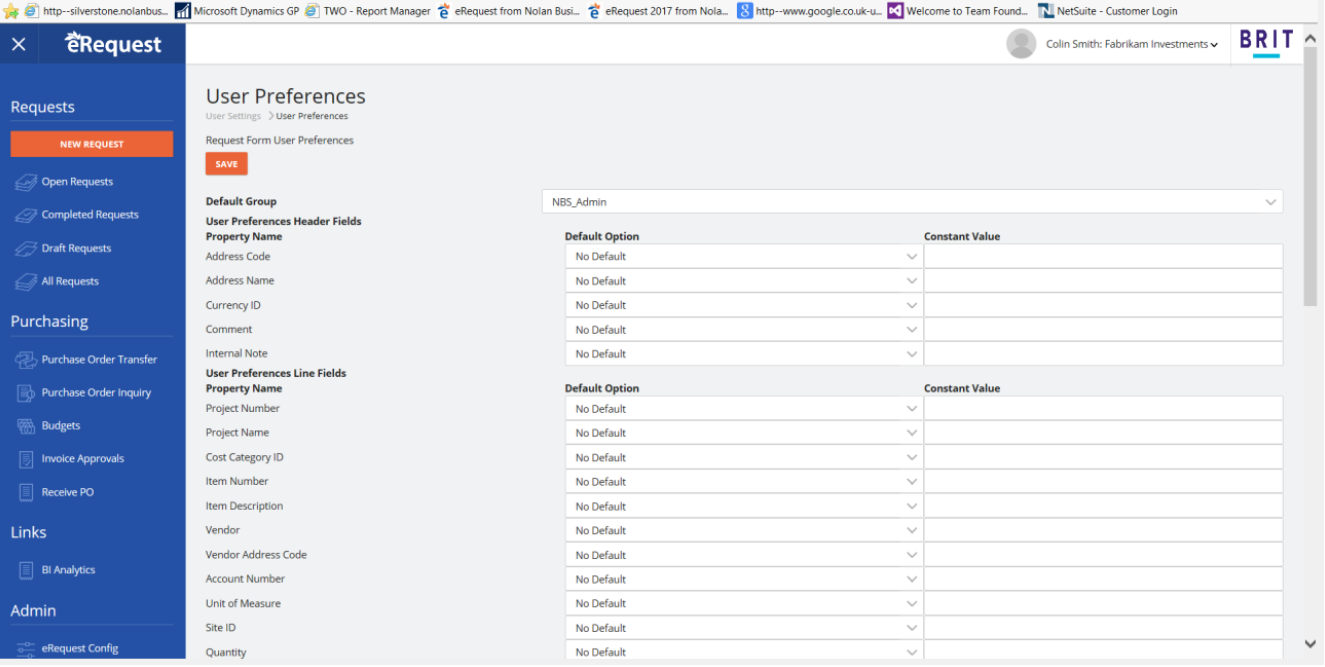
This tab allows the default values for this user to be edited; you can enter default values for all the Request form fields which are visible to the user.
Form Design
With a Request Form selected, click on the ‘Form Design’ tab
This screen allows you to alter the design of the page used to enter Requests based on this ‘Request Form’. All the available fields from the Request Header and Request Lines are listed in the window. Note: PO and Stock Form Types have different fields available
Click on the fields to edit their properties
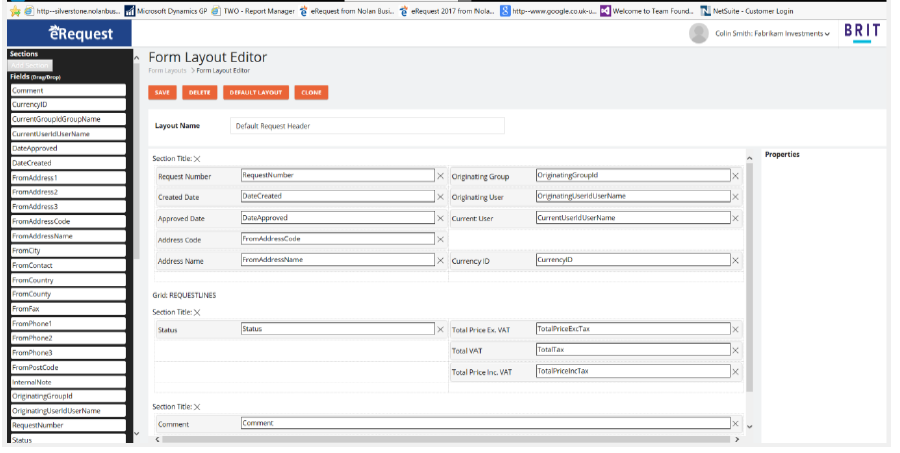
Display Name – Use this field to alter the Label which appears next to the field on the entry form.
Options – Not all the options below are available for all fields, e.g. Some are required by the system or cannot be hidden etc.
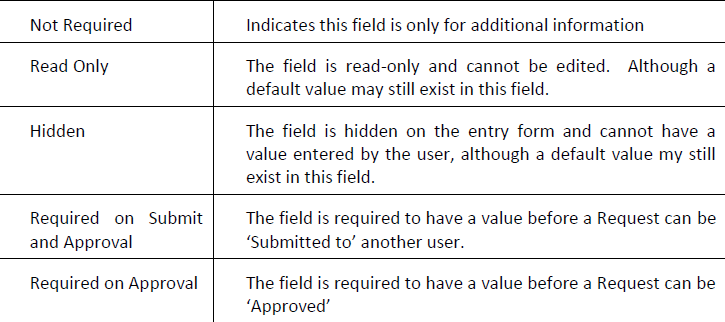
NOTE: In addition to this option a field may still be required by the System. Or have its state changed due to the status of the Request.
Lookup Restrictions
With a Request Form selected, click on the ‘Restrictions’ tab
Use this window to control the restrictions on Items and Vendors which can be selected on Requests based on this ‘Request Form’
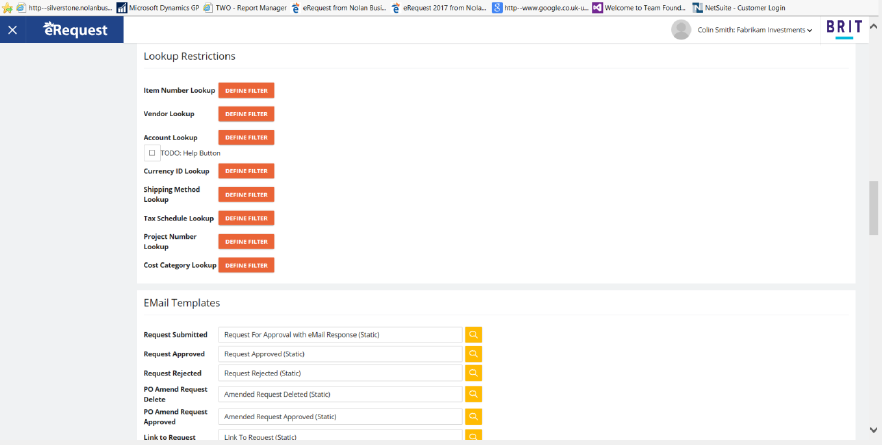
Each of the Lookups listed can have the available records in the lookup restricted using a filter. To define a filter click on the ‘Define Filter’ button next to the lookup.
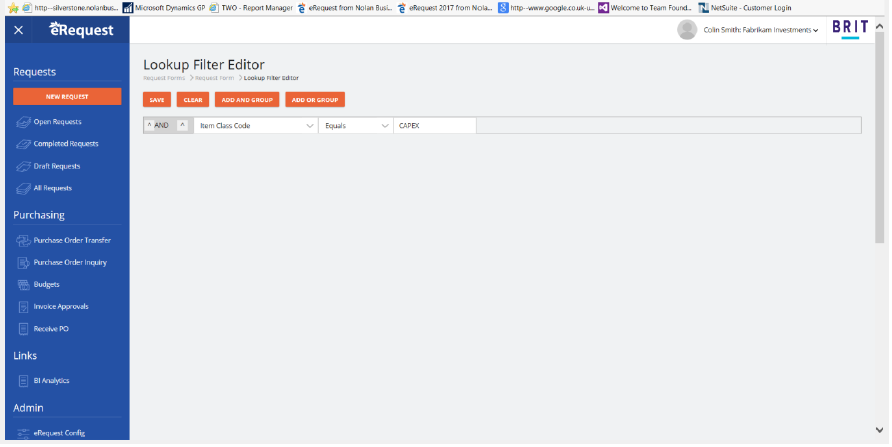
The query designer allows a filter to be defined, each ‘Clause’ consist of a Field name, an Operator and a value. The fields available are the same fields which can be added to the lookup grid, the Operator is specific to the type of the field, eg ‘String’ fields allow, Equal, Not Equal etc. Whereas picklists and Date fields have different Operators.
Clauses are joined together using a group. The group Operator can be an AND or OR operation.
The Groups and Clauses have a menu associated with them, which can be opened using the ‘^’ Button, this allows you to add more clauses to a group, remove or ungroup Clauses. To make a new group of Clauses select the Clauses using the ‘Select’ menu option, and click the ‘AND Group’ or ‘OR Group’ buttons on the toolbar. A new group will be created at that level; you must select at least 2 clauses/groups to make a new group.
Using the designer, a very complex filter can be built up consisting of may ‘AND’ or ‘OR’ groups and may clauses.
Account Lookup – Has an additional option Purchase Accounts only: Restricts the lookup to only show accounts setup on the Vendor as Purchase accounts.
NOTE: Ranges are in the ‘Sort Correlation’ of the SQL Server. And will be case insensitive regardless of the SQL Server Correlation
Reporting (PO Requests)
With a Request Form selected, click on the ‘Reporting’ tab.
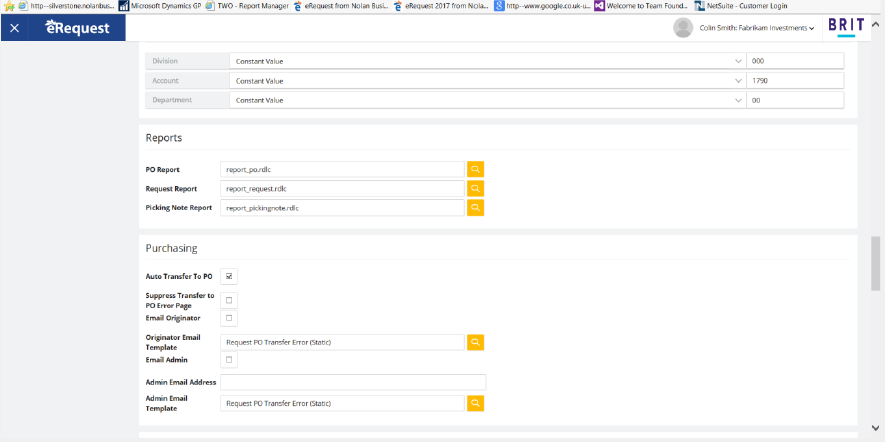
PO Report – The selected report to use on this Request Form when printing Purchase Orders
Request Report – The selected report to use on this Request Form when printing Requests
Use the lookup to pick from any of the existing reports with in eRequest.
When a new request form is created the Default report for each type is automatically selected.
Picking Note Report – The selected report to use on this Request Form when printing Picking Notes
PO Transfers (PO Requests)
Auto Transfer to PO – When enabled requests will be automatically transferred to GP Purchase Orders when a Request is Approved
Suppress Error Page – This is not show transfer errors to user. When a Request is Transfer to PO either from the PO Transfer page or with Auto Transfer when a User approves a request. The Transfer page will not be shown. So users will not see if there is an error with PO Transfer.
Email Originator – Option to enable an Email to be sent to the Originating of the request when it fails to transfer to PO, the email will use the Originator Email Template, this can contain a message indicating the administrator is attending the problem.
Email Admin – Option to enable an Email to be send to an Administrator email address, the email can contain the Request which failed and the error message returned. The administrator can then intervene and use the PO Transfer Errors window to locate the request and retry the transfer.
NOTE: The Error suppression and Emails on error are only available when using the eConnect PO Interface to GP.
Budget Commitments (PO Requests)
This module allows Dynamics GP Budgets to be selected against Financial Years, eRequest will check requests against the data stored in this budget to evaluate the budgeted commitment to compare to the actual spend plus the requested spend.
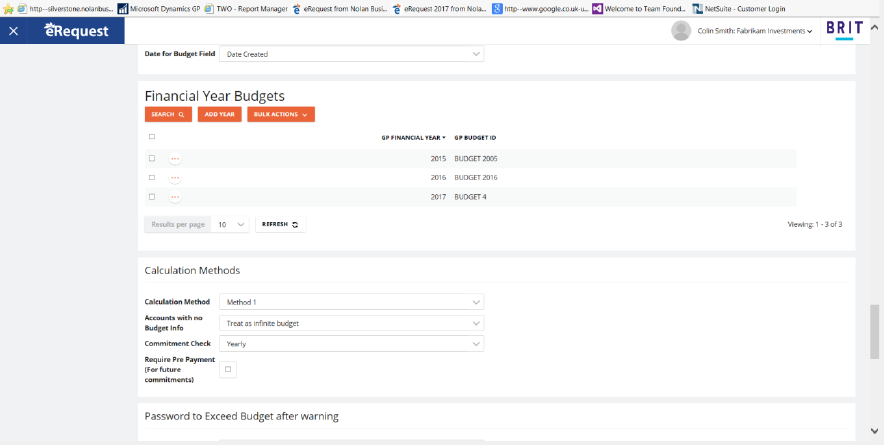
Date for Budget Field – Select which date on the request will be used to determine the Financial Year for selecting the Budget.
Financial Year Budgets – Use the ‘Add Year’ and ‘Remove Year’ to add financial years, and select the Budget associated with that year from Dynamics GP.
Account with no Budget Info – This option controls how eRequest treats accounts which do not have any Budget information.
‘Treat as infinite budget’ means it will ignore these accounts and no budget error will be called
‘Treat as zero budget’ means it will assume a budget amount of 0.00 for the account
‘Show Error’ means it will throw an error on these account indicating they do not have budget information
Commitment Check – This option determines whether budget comparison uses the full year budget amount and existing postings and commitments, or uses only year-to-date figures based upon the date field selected in ‘Date for Budget Field’ being validated.
Budget Segments – These fields are used to control the grouping of accounts on the Budget Overview.
