Summary
This program will be used primarily by systems installers and systems aware users, and allows the definition of the various interface file formats to be integrated to the Dynamics GP General Ledger.
The program allows the definition of the file details, including type location etc., and the mapping of fields within the source file to Dynamics GP posting fields.
Layout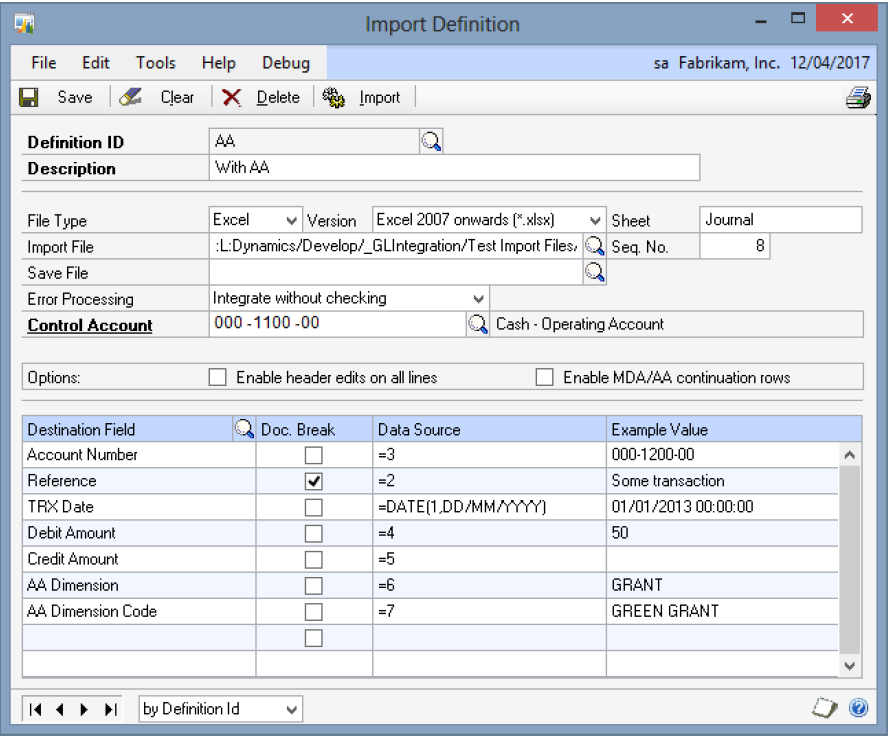
Description
This screen allows the creation, amendment and deletion of import definitions.
Like the standard Dynamics GP cards, the browse buttons may be used to move through the current import definitions, and the lookup button will open a window allowing the selection of a definition from a list of available ones.
An existing import definition can also be retrieved by entering the Definition Id.
Entering a new Definition Id allows the creation of a new import definition.
The Description field is used to provide a general description of the import definition which helps it to be identified when retrieving it for use or amendment.
This description also appears as the comment on each batch created using this import definition, to identify how the batch was created.
The File Type field allows the type of import file to be selected. Supported values are CSV and Excel. For CSV file types, a field separator can be chosen. For Excel file types, the version of the Excel file and a sheet name must be entered.
The source file to be imported should be entered as the Import File. The lookup button will open a standard file window to allow the file to be selected, or the file name can be entered directly.
The General Ledger Interface system supports the use of a sequential number as part of the file name. Each time the file is imported, the sequence number is incremented by one.
To denote the presence of a sequential number in the file name, use a ‘#’ character for each digit of the number.
For example, an import file of GLDATA05.CSV would be entered as GLDATA##.CSV, with a sequence number of five. Once this file had been successfully imported, the sequence number would be updated to six, and the file GLDATA06.CSV would be expected when the import is next performed.
When the import process takes place, it copies the imported file to a save file. This is defined by the Save File name, and like the Import File it can include a sequence number. It will share this number with the import file.
For example, if the save file for the above example was GLSAVE##.CSV,the file GLSAVE05.CSV would be produced by the import process.
When an import process completes successfully, the original import file is deleted (to prevent accidental re-interfacing), so it is advisable that a save file is always provided. The save file cannot be the same file as the original import file.
The Error Processing drop-down list allows the selection of the error processing method to be used when interfacing the import file. This is one of the following options:
Integrate without checking
All the data is delivered to Dynamics GP exactly as it is presented to the integration program with only the minimum of validation.
Correct balances and integrate
The balance at the transaction level for all the distributions is checked, and a balancing distribution posting is created if necessary. Any other errors found are reported and the batch is rejected.
Reject file on journal imbalance
The accounts and transaction distribution balances are checked for every journal before integration is performed. In the event of any imbalance or errors, the batch is rejected and the errors reported.
Reject file on file total imbalance
The distribution balances are only checked as a total for the entire file before integration is performed. In the event of imbalance or any errors, the batch is rejected and the errors reported.
The Control Account field is used to provide the account number to which any balancing postings are made (using the Correct Balances Error Processing option). The lookup button allows the account to be selected from a list of accounts.
The ‘Enable header edits on all lines’ option controls if new header-level values can be set by any document line from the import file or not. If turned off, all the header-level fields will be set by just the first line. This results in a significant performance increase.
The ‘Enable MDA/AA continuation lines’ option allows some lines from the import file to be treated as more MDA or AA lines for the previous distribution, rather than as another new distribution line. When enabled, any line which has the same nominal account as the previous line, and has a zero amount, will have any MDA or AA information added to the previous distribution. Any number of MDA/AA continuation lines can follow a distribution line.
The scrolling window at the bottom of the Import Definition window is where the individual fields are defined.
The Destination Field is the Dynamics GP field to which the data is to be loaded. This may be selected from a list of available fields by using the lookup button.
If you wish to create reversing transactions, the ‘Transaction Type’ Dynamics GP field must be set to 1 for the reversing transaction. This field will default to 0 (normal transactions).
When interfacing the import file, each line of the source file becomes a single transaction distribution. The Doc Break field is used to group these distributions into Journal Entries within the batch.
If no fields have the Doc Break flag set, all the imported lines will appear on a single journal entry.
Where a field does have the Doc Break flag set, a new journal entry is created whenever the value of that field changes. This flag is typically set for the ‘Reference’ destination field.
If the ‘Correct balances and integrate’ error processing method is being used, it is the overall balance of each journal entry which is validated, and a corrective posting is made to that journal entry where required.
The Data Source field indicates where the value for the Destination Field is taken from. This may be a simple constant value, such as a fixed description, or it may be taken from the source file.
To specify a constant value, simply enter the value in the Data Source field.
To use a source field from the import file, use one of the functions described below. Note that each function begins with an ‘=’ character to distinguish it from a constant value.
=nnn ----- Use the source field nnn as found in the import file.
=nnn(dd) ----- Use the source field nnn, rounded to dd decimal places. If dd is negative, this indicates an implied decimal place in the source field, as shown in the example below.
=TODAY ----- Use today’s date.
=DATE(nnn,fmt) ----- Convert the source field from date format fmt. This is explained further below.
=CONV(nnn, yyy) ----- Convert the source field nnn using Code Table ID yyy.
The DATE function uses following format specifiers to locate the day, month and year within the source date, and then converts the date to the Dynamics GP format, held internally as day, month, year.
DD ----- Day, e.g. 21
MM ----- Month, e.g. 11
YY ------ Year, e.g. 95
YYYY ----- Full four digit year, e.g. 1995
The following table provides some examples of use of the Data Source field.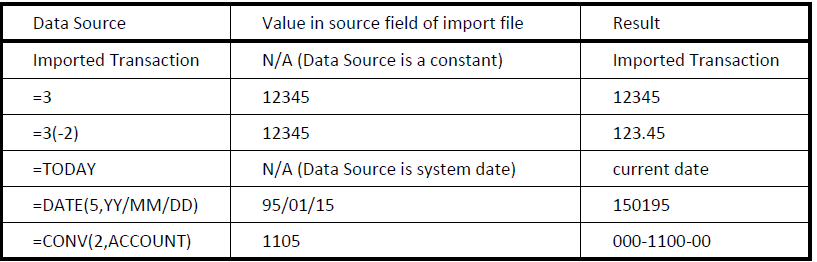
The last example looks for the Code Table with an ID of ACCOUNT, and then tries to find the Key Value 1105 (the source field value). It then uses the Translated Value of the Key Value as the result.
It is important to note that both the DATE and CONV functions consider all characters between the comma and the closing bracket to be significant. If a space is entered after the comma, the CONV function will look for a Code Table Id beginning with a space, whilst the DATE function will expect a character before the start of the date.
The Example Value field in the Import Definition window will show the result of the Data Source entry, using the data found in the first line of the currently defined Import File to provide the source values. If this file is undefined or does not exist, only constant values will be shown in the Example Value field.
Where the Dynamics GP Print function is selected from the menu (File/Print), the interface file definitions report is automatically called.
