Location
Tools >> Setup >> Financial >> Advanced Bank Reconciliation >> Statement Import Format
Layout
Overview
The Format Definition window is used to create a user defined import format that corresponds to the format of the bank statement import file. This is used only with .CSV or Fixed formatted bank statement files. This window will allow for each field in the bank statement file to be defined.
Note: It is not necessary to create a user defined import format when using a BAI import file. Please refer to
Import Maintenance for setting up a BAI import definition.
There are a number of fields that are required in the Format Definition, including the Transaction Date, Transaction Amount, and Check Number. Other fields that should be included are Reference and Transaction Type. While Transaction Type is not a required field, including it in the Format Definition allows for “Reconcile Rules” to be defined, which can help simplify the reconcile process.
Fields
Format ID – A unique name to identify the import format definition.
Description – A description for the format.
File Format – The file format of the statement.
- Fixed Format – Individual fields on the import file are separated by spaces and appear in the exact same position from line to line.
- Comma Separated – Individual fields on the import file are separated by commas.
- Tab Separated – Individual fields on the import file are separated by tabs.
- Custom Separated – Individual fields on the import file are separated by something other than a comma or tab.
Only import lines beginning with – Turn this option on to specify the text that must appear at the beginning of each line in the file to be imported.
Skip Header Rows – The number of rows to skip in the beginning of the import file. This is useful if the bank includes a header row at the top of the bank statement file.
Skip Footer Rows – The number of rows to skip at the end of the import file. This is useful if the bank includes a footer row at the bottom of the bank statement file.
Example File – Select a file that will be used to verify the field setup. This is used as the fields are defined in the lower section of the window, the Example column will populate with the value from the example file. This allows for verification that the correct fields are chosen and properly formatted.
Grid Fields
Destination Field – This defines the field to populate with data from the import file.
- Amount – The amount of the transaction. Positive numbers are considered deposits against the GL account while negative numbers are considered withdrawals to the GL account.
Note: Cannot be used when Debit Amount/Credit Amount are used. - Bank Account – The bank account number the transaction is associated to. If this field is used, then Sort Code/Routing Number must also be included in the definition.
Note: If this field is used in a definition, then the Bank ID does not need to be supplied in the Import Definition as this field determines which Bank ID the transaction goes against. - Check Number – The check number for the bank transaction.
- Credit Amount – The amount of the transaction as a credit. If this field is used in the definition , then the Debit Amount field must also be included in the definition.
Note: Cannot be used when Amount is used in the definition. - Debit Amount – The amount of the transaction as a debit. If this field is used in the definition , then the Credit Amount must also be included in the definition.
Note: Cannot be used when Amount is already used in the definition. - D/C Indicator – A one character field indicating if the transaction is a debit or credit. If this field type is used in the definition, then the Type field will be ignored.
- Reference – The reference for the bank transaction.
- Sort Code/Routing Number – The sort code/routing number the transaction is associated to. If this field is used, then the Bank Account field must also be included in the definition.
- Transaction Date – The date of the bank transaction.
- Type – The transaction type must be defined if reconcile rules will be used or if the transaction type is needed to determine whether the transaction is a debit or credit. During import this field is ignored, regarding a debit/credit, if the D/C Indicator field defined.
Field – The field number in the import file to get the data from.
Start – The position in the field to start gathering data from. Leave this field blank to import the entire field. This field is only required for fixed formats.
End – The position in the field to stop gathering data from. Leave this field blank to import the entire field. This field is only required for fixed formats.
Format Option – The field mask for the fields in the bank import file. Formats only need to be defined for the following fields:
Transaction Date – The date format can be defined using any of the following string options, as long as the format contains month, date, and year components.
- dd – day of the month
- mm – month of the year (01 for January)
- MMM – month of the year (JAN for January)
- yy – two digit year (04)
- yyyy – four digit year (2004)
- DDD – day of the year (100 for March 30th in 2004)
- Any other character will be considered a separator ( / )
Example: mm/dd/yyyy
Note: The month and day format strings must contain 2 characters (mm/dd/yy). ABR requires that month and day formats have leading zeros in the bank statement import file (02/08/04 instead of
2/8/04).
Sort Code / Routing Number
- 9 – Specifies a number.
- “-“ – Specifies a dash/hyphen.
Example: 99-9999-99
Amount
- # - specifies the number
- “-“ – indicates the amount is signed
- (2) – indicates the number of implied decimal places.
Example: -#(2) would format the bank statement number 12345678 during the import as - 123456.78
Example – Example data from the example file chosen in the Example File field.
Buttons
Save – Save the current definition
Clear – Clear all fields
Delete – Delete the current definition
Defining Debits/Credits on the Amount field
Banks may provide a bank statement file in which the transaction amounts come in as all positive (or all negative)
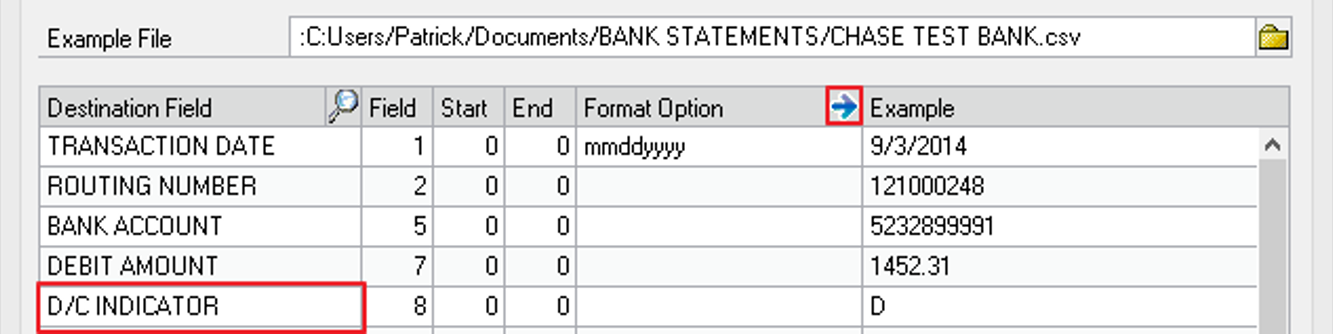
values. When this is the case, ABR can’t determine, just by looking at the amount, if the transaction is a debit or a credit. If one of the fields in the import file is a Debit/Credit indicator (simply a ‘D’ or ’C’) then just add the D/C Indicator field to the format definition. However, most of the time banks don’t supply a simple one character field to indicate Debits/Credits. Instead the Transaction Type field can be used to indicate a debit or credit. To define which Transaction Types are debits and which are credits, click the expansion button in the Format Options field while the cursor is in the Amount field. This will open a new window allowing for each Transaction Type to be associated to a debit/credit value (see figures below).

Menus
There is an added Options menu at the top of the Format Definition window. Format Definitions are company specific, so these options can be used to copy a format definition from one company to another. The Options menu has two choices:
- Import Format Definition – Import from a file a saved format definition.
- Export Format Definition – Export to a file a saved format definition.
Definition – Export to a file a saved format definition.
Import Format Setup Example
For the purpose of this example, we will use a sample Comma Separated (sample.csv) file with the following data in it:
"02/01/2017",475,-1234.56,"Check:1234" "02/02/2017",475,-123.45,"Check:4323" "02/03/2017", 175,100.00,"Deposit"
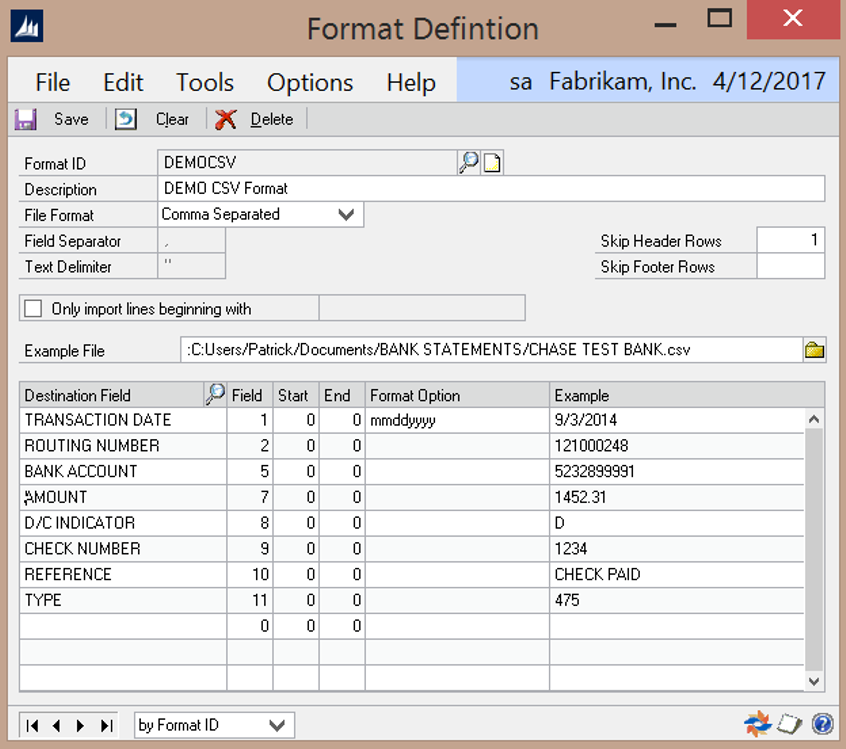
This data will be used to show how to create an import definition. The new import definition is created in the Statement Import Format screen (Tools >> Setup >> Financial >> Advanced Bank Reconciliation >> Statement Import Format). A descriptive name is entered in the Format ID (the bank name for example), as well as a description for the format. The Comma Separated option is selected in the File Format, since the sample file is saved as a .CSV format.
The Sample.csv file referenced above is entered in the Example File field. This file is used to display data in the Example column of the grid as fields are added to the Format Definition, allowing for field mapping validation. The Skip Header Rows and Skip Footer Rows are set to ‘1’ since the sample file doesn’t contain any headers or footers. If the actual bank statement file had different header or footer information, then these fields will need to be set accordingly.
Note: It is recommended to have the bank statement file open in Notepad/Excel while doing this.
The Field Layout is now defined in the grid section of the screen. Looking at the data from the sample file above, the first field is the transaction date. Starting on the first line in the grid section of the window, Transaction Date is selected for the Destination Field using the expansion button. Then the value of 1 is entered in Field, since it is the first field in the bank statement. Start and End are both set to 0 since the entire field is used. A date format is entered in the Format Option field. The date format is entered as “mmddyyyy” to match the format from the sample file. The value of 9/3/2014 displays in the Example column, which is pulled from the Sample.csv file. (see Figure 4 below)
On the second line the value of Routing Number is entered in the Destination Field and the value of 2 is entered in Field. On the third line the value of Bank Account is entered in the Destination Field and the value of 5 is entered in Field. It is 5 instead of 3, because there was no useful information in column 3 and 4 of this particular statement.
The fourth field Amount is in column 7 and since there were no dashes or parenthesis to indicate debit or credit, there was need to indicate this by adding a D/C Indicator field which lies in column 8 of the DEMO bank statement.
Check Number is column 9 and if there happened to be “cluttering information” before the check number, I could skip to the useful information by adding numbers into the Start and End columns. For Example: If in the file the check number displayed as XS0001234 you could enter Start: 6 End: 9 to display just 1234.
NOTE: There must be a Type field mapped to create reconcile rules. A BAI transaction type can be mapped, as well as a reference to use for grouping. If references are being used as types it is perfectly fine to use the same Field number.
