Location
Transactions >> Financial >> Advanced Bank Reconciliation >> Reconcile Bank Transactions
Layout
Overview
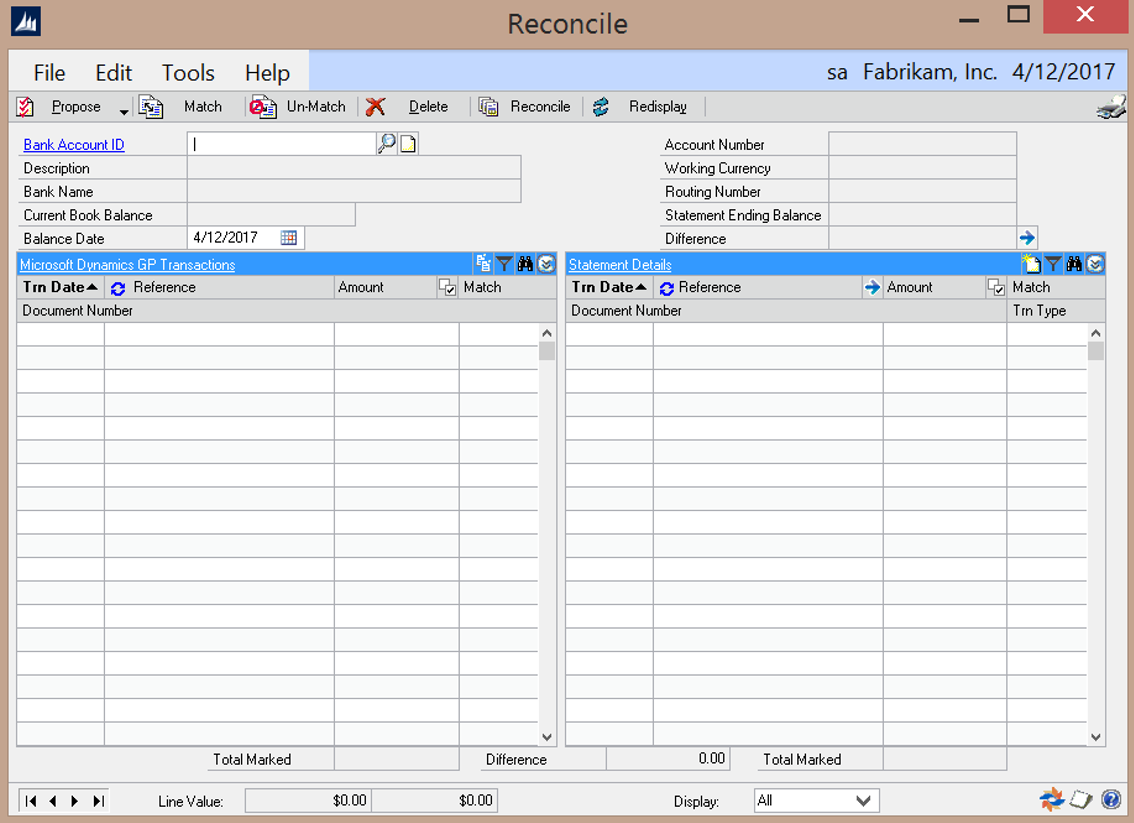
The Reconcile window is the central focus of ABR. This window is the starting point for automatically matching transactions between the bank and GL using the Propose button and Reconcile Rules.
Fields
Bank Account ID – The Bank Account to be reconciled
Description – Displays the description of the bank account associated to the selected Bank Account ID
Bank Name – Displays the name of the bank associated to the selected Bank Account ID
Current Book Balance – Displays the GL balance of the account(s) assigned to the selected Bank Account ID. This amount includes all outstanding checks, deposits in transit, etc. If multiple GL accounts are assigned to the Bank Account, then the balances are consolidated.
Balance Date – Enter the ending date of the reconciliation. (Defaults are controlled by the Extract Options setup window)
Account Number – Displays the account number associated to the selected Bank Account ID Working Currency – Displays the working currency associated to the selected Bank Account ID. Routing Number – Displays the routing number associated to the selected Bank Account ID.
Statement Ending Balance – Displays the statement ending balance as processed (via Bank Statement Entry or
Statement Import) for the current reconciliation.
Difference – Displays the calculated difference between the Current Book Balance and the Statement Ending
Balance.
• Expansion Button – launches the Difference window which displays the calculation used to derive the difference displayed. See details on the Difference window below.
Grid
Trn Date– Displays the transaction date for the transactions
Reference/Document Number– Changes the display on the first line in the transaction grid from the Reference field to the Document number field.
Amount – Displays the amount for the transactions
Checkbox – In the transaction header there is the “Mark All” button in the Amount column. Clicking this checkbox will select all of the transactions currently displayed. Checking the box for individual transactions allows for manual matching.
Match – Displays the match number assigned to each matched transaction during the reconcile process.
Document Number – Displays the document number for the transactions
NOTE: All of the above can be sorted by clicking on their respective box.
Consolidate button – launches the Transaction Grouping/Consolidation window. See details of this window below.
Create GL Trx button – launches Nolan’s modified Transaction Entry window. See details of this window below.
Find – Brings up a new window allowing you to search for transactions. The search field is selectable by which sort option is selected.
Filter Transactions – Launches a window where the user can filter transaction using a variety of criteria.
Buttons
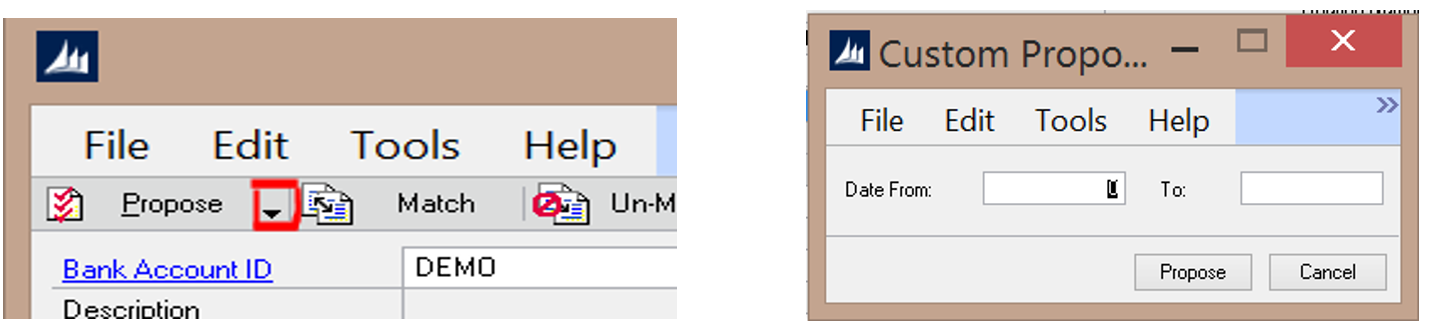
Propose – Runs the Propose process. This process looks at each bank statement transaction and attempts to match it to a GL transaction by the Amount if no reconcile rule exists for that bank statement transaction type. If a reconcile rule does exist for the transaction type, then the rule is used to match the bank statement transaction with the appropriate GL transaction. If tolerance values are displayed, a new window will appear listing any transactions that could be matched within the tolerance values. If you accept the matches then GL transactions will be created to the tolerance account.
• Custom Propose – This allows the user to run the propose process for a specified date range. For example if Date From = 1 and To = 10, the propose process will only match transactions from day 1 to day 10 of the reconciliation period.
Match – Manually matches the selected (checked) GL transactions with the selected Statement transactions. The Total Marked amounts must be equal for a manual match to process. If tolerance values are displayed, a new window will appear listing any transactions that could be matched within the tolerance values. If you accept the matches then GL transactions will be created to the tolerance account.
Note: You can match transactions on the same side of the window. Bank transactions can match bank transactions and GL transactions can match GL transactions as long as the transactions net to 0.
Un-Match – Un-matches the currently selected transactions. All transactions with a specific match number must be selected to Un-match. Only one match number can be un-matched at a time.
Delete – Deletes all the current matches. This is the same as un-matching all records. This does not delete any transactions.
Reconcile – Runs the reconcile process and produces the reconcile reports.
Redisplay – Refreshes the screen.
Difference Window
This window displays the difference between the Adjusted Bank Statement Balance and the General Ledger for the selected reconciliation.
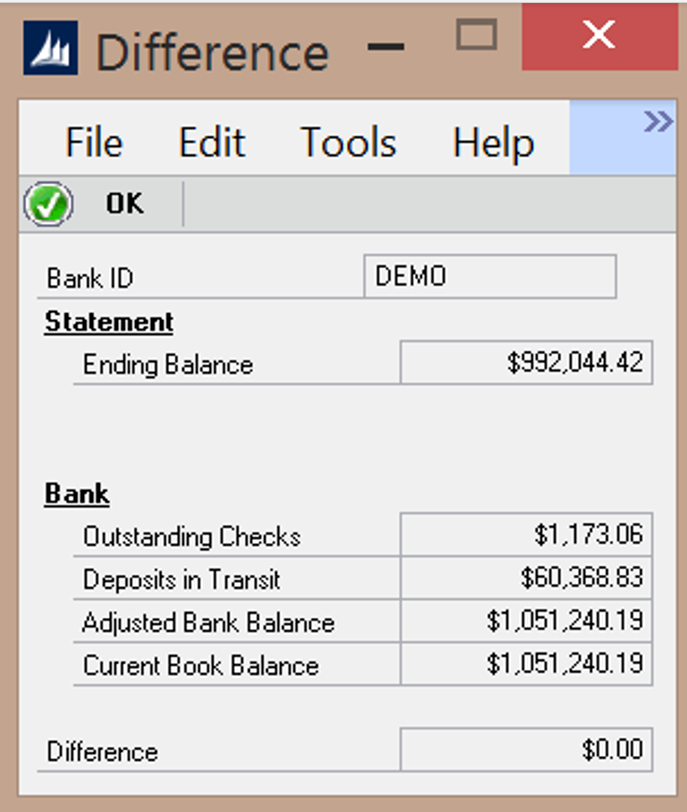
Bank ID – Displays the Bank ID being reconciled.
Statement
Ending Balance – Displays the Statement ending balance.
Bank
Outstanding Check – Displays the total of all outstanding checks on the GL side.
Deposits in Transit – Displays the total of all deposits in transit on the GL side.
Adjusted Bank Balance – Displays the adjusted bank balance (Statement Ending Balance – Outstanding Checks + Deposits in Transit)
Current Book Balance – Displays the current GL book balance.
Difference – Displays the difference between the Adjusted Bank Balance and the Current Book Balance
Transaction Grouping/Consolidation
This window, launched by clicking on the Consolidate link on the GL side of the Reconcile window, is used to group multiple GL transactions to match with a single Bank Statement transaction. It can also be used to review transactions grouped by the Deposit Groups functionality.
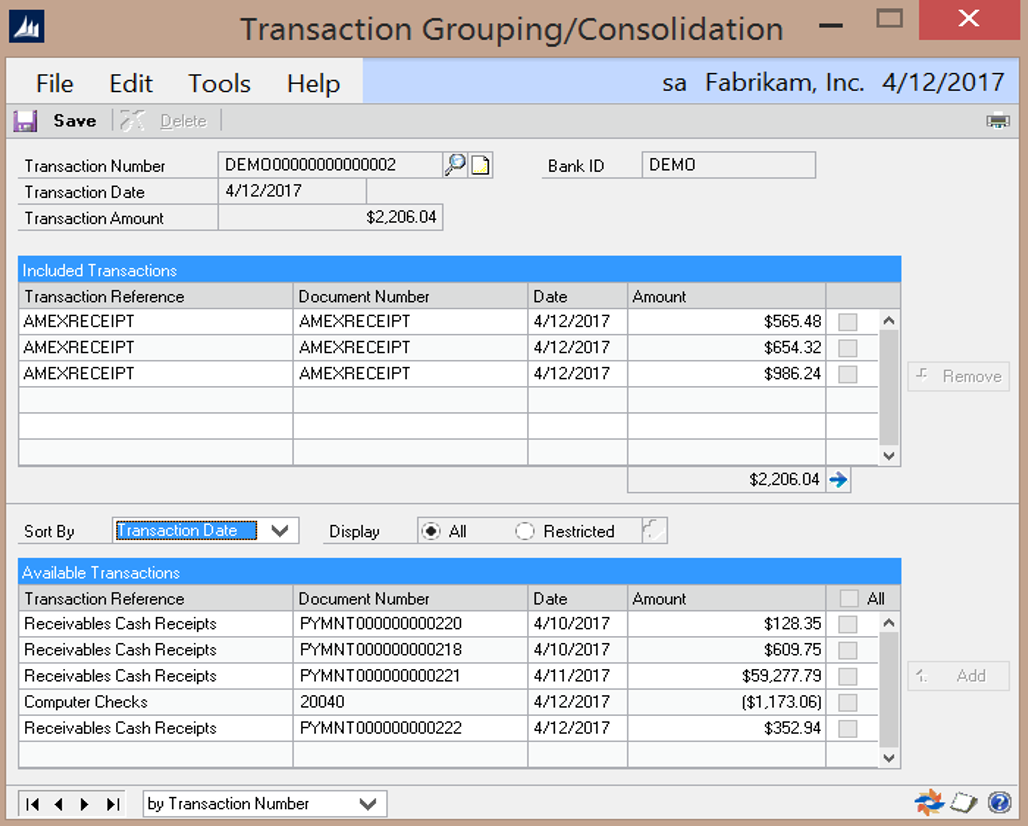
Transaction Number – A unique identifier for the consolidated transaction. This is user assigned when creating a new consolidation and system assigned when the Deposit Grouping functionality creates a consolidation.
Transaction Date – The transaction date for the consolidated transaction. This is user assigned when creating a new consolidation, and system assigned when the Deposit Grouping functionality creates a consolidation.
Transaction Amount – The total amount of the consolidated transaction.
Bank ID – Displays the Bank ID associated to the consolidated transaction.
Transactions Included – This section of the window will display the transactions selected for the consolidated transactions. These transactions are selected from the Available Transactions section below.
• Transaction Reference – displays the reference associated to the selected transaction
• Document Number – Displays the document number associated to the selected transaction
• Date – Displays the transaction date associated to the selected transaction
• Amount – Displays the amount associated to the selected transaction
Sort By – Controls the order in which the Available Transactions are sorted/displayed in the grid below.
Display – Controls the transactions that are listed in the Available Transactions grid.
• All – displays all outstanding transactions for the reconciliation
• Restricted – allows the user to select a range of outstanding transactions by launching the Range Selection window and entering in the selection criteria. See details for this window below
Range Selection
Range Selection window allows the user to enter one or multiple criteria to use in filtering the transactions displayed in the Available Transactions grid.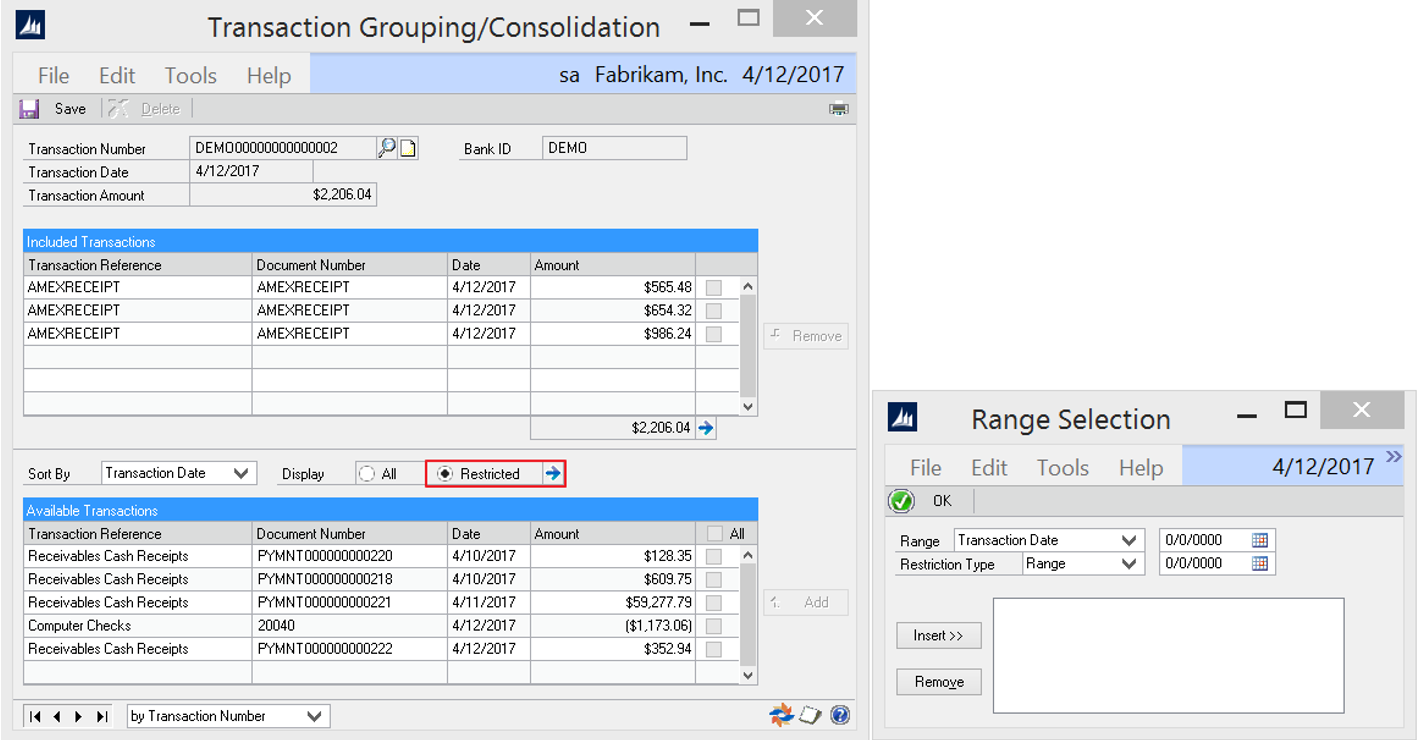
Range – Select from the list of selection options:
• Transaction Date
• Amount
• Reference
• Check Number
Restriction Type – Select a Restriction Type:
• Range – allows user to select a range of dates, amounts, references or check numbers
• Like – allows user to enter specific data or use wildcard characters as selection criteria. The ‘Like’ restriction can be used with any wildcard characters that conform to the MS SQL wildcard syntax. (see Appendix D: Consolidate Range Selection Wildcard Options for details)
Insert (button) – Inserts the selection criteria (allowing for multiple selection criteria to be entered)
Remove – Removes the selection criteria
OK – Closes the window and applies the selection criteria to the Available Transactions displayed in the grid.
Create GL Trx (Transaction Entry)
This window, launched by clicking on the Create GL Trx link on the Reconcile window, allows the user to create a GL Transaction from a selected Bank Statement Transaction. The Cash Account and Amount are automatically populated based on the Bank Statement transaction selected in the Reconcile window.
Posting a transaction in this window will post it through the GL and add the posted transaction to the GL side of the
Reconcile window without having to run the Extract GL routine.
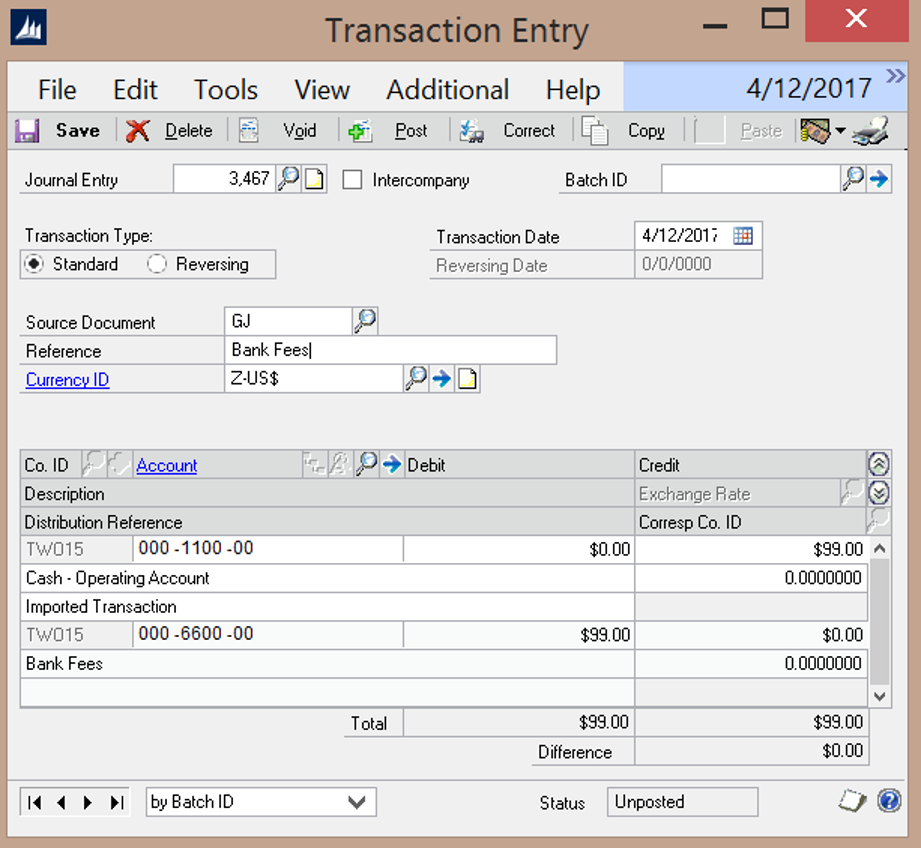
The only fields the user needs to populate on this window are:
Reference – A reference / description for the GL Transaction.
Debit or Credit Account – The GL account associated to the cash transaction.
