Installation
Before installing Nolan Business Solutions’ Scheduled Cash Collection, please ensure that there are no users logged into Microsoft Dynamics GP as this could adversely affect the installation process.
This process will need to be completed on all workstations on which Microsoft Dynamics GP is installed. However, if Microsoft Dynamics GP is run from a network (DYNAMICS.dic is installed in a network location), you only need to install to that location.
- Launch the install application (downloaded from here).
- Follow the on-screen instructions to complete the install. The install will confirm the location of Microsoft Dynamics GP and will install the Scheduled Cash Collection chunk file into this directory.
- Once the install has completed, run Microsoft Dynamics GP to load the chunk file.
Setup
Form security changes, additions to the menu structure, and any necessary file upgrades are not made during the previous application install process. Use the Install window to complete these tasks automatically by following the steps below. See Appendix A for information on which forms and menus will be affected.
- Make sure that no other users are logged into the system.
- Start Microsoft Dynamics GP – if you log in using the ‘sa’ user, the install window will automatically be
added to your shortcuts (go to step 7). You must login as ‘sa’ to install when using Microsoft Dynamics
GP on a SQL database. - Open the ‘Shortcut Bar’ and select Add. Then select Other Window.
- Enter Scheduled Cash Collection Install into the Name field and then expand the Nolan Business
Solutions Scheduled Cash Collection folder in the Available Windows list. - Expand the Company folder. Then find and select the Install Scheduled Cash Collection window in the
list and push the Add button. - Click on the Done button to close the Add Shortcut window.
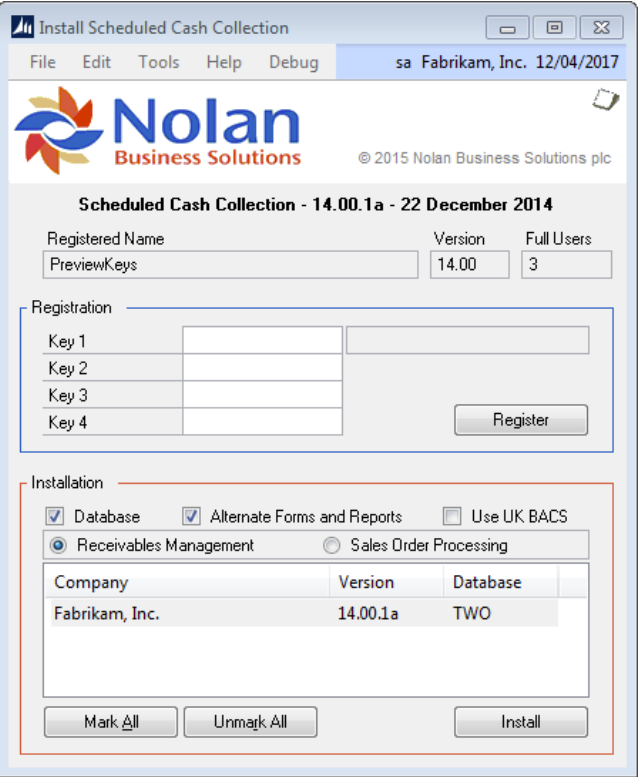
- Select Scheduled Cash Collection Install from the Shortcut Bar. A window showing all the companies will
appear, as illustrated below.![]()
- To register Scheduled Cash Collection, enter your Registration Keys in the fields provided (You will have
received these Registration Keys with your purchase of Scheduled Cash Collection). This is required to
enable use of Scheduled Cash Collection in companies other than the sample company, ‘Fabrikam, Inc.’.
Note: The registration keys may have a built in expiry date. This information is displayed at the
bottom of the window (to the left of the Install button). - Click on the Register Button, you will receive a message indicating that the Registration was successful.
- The Set Security option will set default security for all users to access the alternate forms and reports.
N.B. This will not replace existing security settings (i.e. will not grant a user access to posting screens if
they had previously had access removed). - For SQL Installations, make sure the Build Tables option is ticked to create the tables on SQL, set
permissions to them correctly and install stored procedures. - If this install is an upgrade from any previous version of Scheduled Cash Collection, or part of a Microsoft
Dynamics GP upgrade, make sure the Upgrade Tables option is ticked. The install window will
automatically default this option to ticked if it detects a table upgrade is required. - The Install To: radio group allows the user to install the SOP Scheduled Cash Collection or the RM sales
transaction version of Scheduled Cash Collection. - Use the Mark/Unmark, Mark All and Unmark All buttons to mark all the companies to install Scheduled
Cash Collection to. Finally, push the Install button.
The system automatically places all Scheduled Cash Collection windows on a new ‘Scheduled Cash Collection’
sub-menu on the affected Microsoft Dynamics GP menus, for example Tools, Setup, Financial, Scheduled Cash
Collection will then list each of the Scheduled Cash Collection setup screens.
