In this section we will describe in more detail the function of this process and how to utilise it fully.
Format Definition Window
File Type
There are two file types you can choose from. Separated Values and Fixed Format.
Separated Value files look something like this depending on the options chosen:-
“INV1125”,”Customer Header 001”,”79”,”1.00”,”GOA4535”
The basic premise behind this format is that each field on the line is enclosed in ‘delimiters’, in this case quote’s (“) and separated by ‘separators’ in this case comma’s (,). You can define what characters you use to separate and delimit the files using the fields provided.
A fixed format file would look something like this:-
72000003036243062000000000000000000000000010002511.862511.863221755298342
There are no separators or delimiters here, each field occupies an assigned position and length within the line. So for example instalment amount could exist at position 40 to position 50, which would give it a length of 11 characters.
Field Separator
If you have selected a separated value file type then this is where you select which character you wish to separate your fields with. The drop down lists the most popular characters or you may select custom and enter your own character in the space provided. The drop down list refers to the following characters:
Comma = “,”
Tab = “ “
Custom = type in your own.
Field Delimiter
If you have selected a separated value file type, then you may select a character to delimit your fields with. The drop down list contains the most commonly used characters and you can also select custom to enter a character of your choosing. The drop down list provides the following characters:
None = no delimiter for your fields.
Single Quote = ‘
Double Quote = “
Custom = enter your own character.
File Structure
The file structure box gives you an easy to read view of your export formats current file structure. The UKBACS structure is defined as a single line per transaction however the structure will allow for formats requiring a hierarchy within the file structure/. For Example:
Record A – File Header ( 1 per file )
Record B – Account Header ( 1 per bank account/chequebook id )
Record C – Client Header ( 1 per customer account)
Record D – Transaction Line ( 1 per transactions )
Record C’ – Client Footer ( 1 per customer account )
Record B’ – Account Footer ( 1 per bank account/chequebook id )
Record A’ – File Footer ( 1 per file )
You can have more than one instance of each of the row type’s. So you could have three Transaction Line row’s defined which would print out three transaction lines for each transaction. The same also applies for the all other row types.
Move Up Button
If you have multiple instances of a single row type ( such as 2 file header rows ) then you can select one of the rows and use this button to move it up one space within the file structure.
Move Down Button
If you have multiple instances of a single row type ( such as 2 file header rows ) then you can select one of the rows and use this button to move it up down space within the file structure.
Format Row Definition Window
Row Type
There are seven different type of row types which are as follows:-
File Header, Account Header, Customer Header, Transaction Details, Customer Footer, Account Footer and File Footer.
The row type determines which ‘block’, so to speak, the row belongs to. The type also determines when the line gets printed. The following list indicates when each type gets printed:
File Header :
Gets printed at the top of each export file.
Account Header :
This gets printed at the start of each new account.
Customer Header :
Gets printed at the start of each new customer.
Transaction Details :
Gets printed for every payment.
Customer Footer :
Gets printed at the end of each customer.
Account Footer :
This gets printed at the end of each account
File Footer :
Gets printed at the bottom of each export file
Row Sequence
This number indicates the position of the row within its row type. So if, for example, you had three transactions lines, the first of these would have a row sequence number of 1 the next would have a number of 2 and the next a sequence number of 3.
Include Row
This array of drop down lists allows you to choose to put a condition on whether or not the row should be printed. The first drop down box allows you to choose either ‘Always’ or ‘Conditionally’.
If you choose ‘Always’ then the other drop down lists for this option are disabled and this row will always get printed.
However if you choose ‘Conditionally’ then all the other options will be enabled. The first of these is the field you wish to place the restriction on. The lookup will provide you with a list of these fields so you may choose one.
Next along is the is / is not drop down list which combines with the following drop down list which provides you with a list of the following options.
‘equal to’
‘less than’
‘greater than’
‘starting with’
‘ending with’
‘containing’
‘part of’
So with these two drop down lists you can form your condition such as – is equal to, is not less than, is part of, is not starting with.. etc, etc.
The last field of the include row set is the field where you type the value relating the field you have to meet. So an example conditional could be like this.
‘Conditional’ where field ‘Payment Amount’ ‘is’ ‘less than’ ‘15.00’
So in that case the row would be printed if the payment amount was less that 15.00. If it was equal or higher then it wouldn’t be printed
Scrolling Window
Here, in the scrolling window, is where you will define each of the fields that will go into the row you are currently editing. As before for the other windows we will run through each of the fields on this window in some detail so you may obtain a clearer understanding of how this all fits together.
Position
This works in different ways depending on which file type you have selected.
For ‘fixed format’ file types the position indicates the character position the field will start at. So position 30 would indicate the this field will start at character 30 of this row and position 14 would indicate that this field will start at character 14 of the row.
However, for ‘separated values’ file types the position indicates the field number this field will occupy within the row. So if the position was 3 then the field would occupy the third field along in the row like so:
“Field 1”,”Field 2”,”Field 3”,”….
Field 5 would occupy the fifth field along like this.
“Field 1”,”Field 2”,”Field 3”,”Field 4”,”Field 5”,”…
Length
This again works in different ways according to which file type you have specified. For ‘fixed format’ file types the length indicates the length of the field, i.e. the amount of characters assigned to it. So a field with a position of 5 and a length of 7 would take up characters 5 to 11 like so.

And a field defined with a position of 1 with a length of , say, 10 would take up characters 1 to 10, as shown in
this diagram:-

If you selected the ‘separated values’ file type the this all works a little differently. You may leave the length as 0 and if this happens then the space for the field will formatted to be as long as the actual field you want to place in there is. However if you type in a length for your separated value field then the field will only be as long as the length you defined. So, if you were placing the value “This is a field” into a separated value field and you chose the length to be 11 then the field would be printed out like this :-
“This is a f”,
or if the length was 6 it would be :-
“This i”,
If the length was 0 though the full string would appear like so :-
“This is a field”,
And so on.
Defined as:
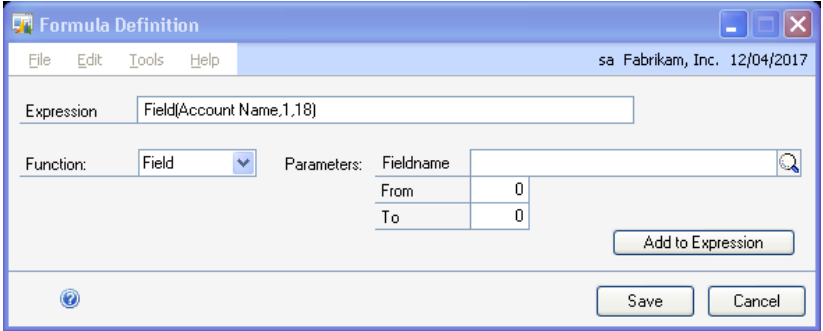
This is where you choose what to place in this specific field. There are two ways you can enter a field definition here. You can either type it in directly or use the formula definition window provided which you access by using the expansion button nestled next to the defined as prompt. The procedure for defining fields has quite a few features and we will assume, for purposes of explaining, that you are entering the definitions in the formula definition window. The window looks like this:
Utilizing this window you can create a expression of sorts to inform the system what you want to be placed in this field. You may use constant values ( i.e. characters you just type in ), functions and + or -. I will explain each of these in turn then run through a few examples on how to use them together.
Functions
There are four functions which you may use in your expression. They are:
FIELD(fieldname) :
Where ‘fieldname’ is indicated is where you would type then name of the field. The function will then place the value of the field you selected into the space allocated. You can also define a length of field to return like this:
FIELD(fieldname, from, to) where ‘from’ is the position where you wish to start cutting and ‘to’ is how many characters you wish to cut out.
Ok, so for example, if you wanted the company name in the field you are defining and the company name is “Fabrikam Inc”. So if you wanted the whole of the company name you would define the expression as - Field(Company Name). You could either type this directly into the expression field or , and this method is the more recommended, you can drop down the function box and select the field function and then select the fieldname lookup, find company name and select that then hit the ‘Add to Expression’ button this will add Field(Company Name) to the expression. This way is safer than typing it straight it, although the system will inform you if the expression you have entered is invalid.
However if you only wanted, say, the first 9 characters of the company name the expression you would need would be - Field(Company Name,1,10) – this would give you “Fabricam ”. Again you can type this straight in or copy the method above for using the boxes and buttons provided but before you hit the ‘Add to Expression’ button you would enter 1 into the ‘From’ field and 10 into the ‘To’ field. This works like position and length in the scrolling window.
SUM(fieldname):
This function calculates the sum of the field selected, but only within the current file section. So for example if you had three lines of transaction lines printed and each had a payment amount of £10.00 and in the customer footer you defined one of the fields as Sum(Payment Amount) the value of this would be £30.00, i.e. all the payment amounts for the customer. If it was in the account footer it would be all the lines for the account ( chequebook id) and if it was in the file footer it would be all the lines for that export file.
You can defined this expression by simply typing it in or using the fields provided. So you would drop down the function list and select Sum and then open up the fieldname lookup, find Payment Amount and select that and then hit the ‘Add to Expression’ button.
COUNT(Row ID):
This function will count the number of times the Row ID specified has been printed so far. So, if for example, you defined Count(TRX LINE1) in the file footer, and the export file had printed off 7 rows with the row id of ‘TRX LINE2’ the result of this function would be 7.
Again you can simply type this in or use the fields provided. If you drop down the functions list and select Count then you will see that the Fieldname prompt has changed to Row ID. If you open the lookup you will be presented with a list of the Row ID’s that exist for this format, select the one you want, in this case TRX LINE2, and then hit the ‘Add to Expression’ button.
+ and – operators
Lets explain the uses of + first. It has two uses. Firstly it can be used to add strings together. E.g.
assuming company name is “Fabrikam Inc.” and User ID is “LESSONUSER 1”..
Field(Company Name) + Field (User ID) = “Fabrikam Inc..LESSONUSER 1”.
Secondly it can be used for adding numeric values together. For example:
assuming payment amount is £12.50
Field(Payment Amount) + Field(Payment Amount) = 25.00
The – symbol however only has one use. You use it to subtract numeric values from one another. So e.g.
assuming payment amount is £12.50
Field(Payment Amount) + Field(Payment Amount) – Field(Payment Amount) = £12.50
(equates to £12.50 + £12.50 - £12.50)
Constant Values
Basically what this means is you can add any value you wish to type in to the expression. If you are adding a string to the expression you will need to enclose it in quotes (“”). OK, so say you wanted to add ‘Comp Name-‘ on front of the company name you would define the expression as follows.
“Comp Name- “ + Field(Company Name).
This would be printed out as “Comp Name- The World Online Inc.”, assuming the company name was The World Online Inc.
If you are including a numeric expression then you can simply type it on without quotes. ( the idea of the quotes is to signify to the system that the value enclosed within them is a string ).
So, if you wanted to add 5 to the payment amount of a line you would define the following expression:
Field(Payment Amount) + 5.
Assume the payment amount was 12.50 then this would equate to 17.50
Notes on Expressions
You can’t mix numeric and string values within a single expression, you must have either all of one or all of the other
The - symbol isn’t allowed within string expressions.
Formatting
Once you have expressed/defined your field you may format it in different ways according to the type of
expression you defined. The formatting is like a type of mask you fit the field into. We will run through the
different types of formatting available.
String Formatting:
The following options exist for string formatting.
X - denotes a single character
* - denotes the remaining characters of the string
& - when used as the first character of the format mask, forced leading spaces rather than trailing
spaces.
If there is any other character used in the mask then this will be used as a constant character within the
formatted string.
For example:
&* - formats the string to have leading spaces.
XX-XX-XX - this could be used for a bank sort code, e.g. 090226 becomes 09-02-36
X=XX=* - e.g. 91234567890 becomes 9=12=34567890
Numeric Formatting:
These are the options for numeric formatting:
- - denotes the sign will be shown, ‘-‘ for negatives, space for positives
+ - denotes the sign will be shown, ‘-‘ for negatives. ‘+’ for positives
9 - denotes a single digit (will round normally where required)
d - denotes a single digit (will always round down)
u - denotes a single digit (will always round up)
0 - fixed zero
. - denotes a decimal place
v - denotes a virtual ( or implied ) decimal place.
, - numeric separator.
Examples ( all for a value of 1234.56):
-9.99 = 1234.56
+9.99 = +1234.56
+9,999.99 = 1,234.56
9v99 = 123456 ( no decimal place indicator as this was formatted as virtual and no leading space )
9000 = 1000 (number to the nearest thousand)
d000 = 1000 (number rounded down the nearest thousand)
u000 = 2000 (number rounded up to the nearest thousand)
9u00.00 = 1300.00 (number rounded up to the nearest hundred)
99d0 = 1230 (number rounded down to the nearest ten)
99u0.00 = 1240.00 (number rounded up to the nearest ten)
NB: Don’t worry if the value is greater than the amount if digits you have specified in the format mask, the
system will automatically extend it to compensate.
Date Formatting:
The following options exist for date formatting
dd - day of the month
mm - month of the year
yy - year ( without century i.e. 2 digit year)
yyyy - full year
DDD - day of the year
MMM - three letter abbreviation for the month ( e.g. January – JAN, February – FEB and so on )
Any other characters encountered will be put in as they are for separators.
So you basically combine the above options to form a date formatted to your choosing.
So for an example date of 21st January 2000
dd/mm/yy - 21/01/00
yyyymmdd - 20000121
yy-DDD - 00-021
DDD/MMM - 021/JAN
