This page allows editing of requests, if the Request Form this Request is based on has been altered the page may look different and some fields may not appear.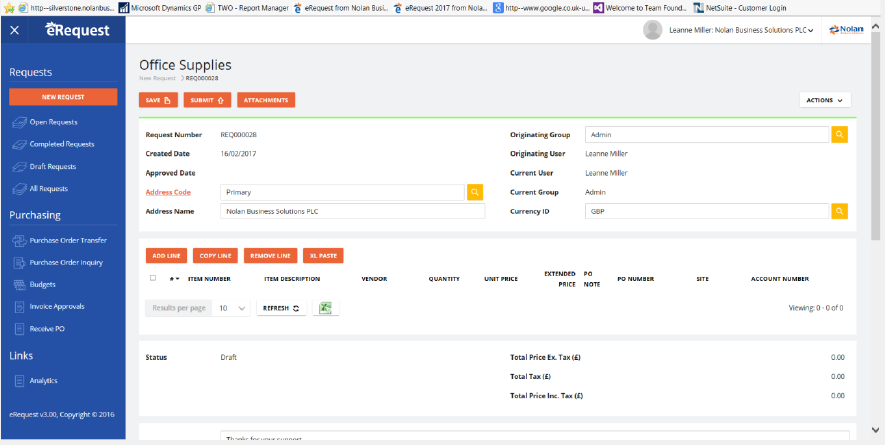
The following fields may appear on the page:
Request Number – This is the number for this Request; this is generated by eRequest
Date Created – This is the date this request was created
Date Approved – When a request is ‘Approved’ this will display the date
Address Code – Use this field to select the address to deliver to, this is looked up from your company addresses in Dynamics GP.
Address Name – This is the Address Name from the selected Company Address
Originating Group – The user group the user is acting as; when entering a new Request this contains a dropdown list of all the groups the user belongs to. This controls which group this request will belong to and affects which parent group the ‘Submit to’ users will be selected from.
Originating User – The user which created this request
Assigned To – The user this Request is currently assigned to.
Currency ID – The currency for this Request. (PO Requests)
Comment – A comment which will be transferred to the Purchase Orders generated from this Request
Internal Note – An internal note which doesn’t get transferred to Dynamics GP or printed out on the Purchase Order
User Defined Fields – a number of user defined fields are proved, 4 fields of each type are available (string, decimal, date and picklist). You can show/hide these fields in Management Studio form design.
Request Action Button
To add new lines to the Request, click the Add Line button.
To remove lines from the Request select the line in the grid and click on the ‘Remove Line’ button.
To edit an existing line double click on it in the Grid.
To copy an existing line, select the line in the grid and click on the ‘Copy Line’ button.
To save a request as a draft click on the ‘Save as Draft’ button, or the ‘Save and New’ button. ‘Save and New’ will save the current request as a draft and then clear the entry form to allow a new request of the same type to be created.
To submit a request for approval click on the ‘Submit’ button (See submitting a Request for Approval)
To duplicate a request click on the ‘Duplicate’ button this will close the current request and create a new request copying the details from the previous one. The new request will be owned by your user and will start as a draft.
To delete or void a request click on the ‘Delete’ button or the ‘Void’ button. You can only do this for requests which haven’t been submitted or approved yet. Whether you have the option to delete or to void is determined by the setting for the current GP company.
To print a Request click on the ‘Print’ button this will open a page with the request details more suitable for printing, once the page has opened, select File Print from Internet Explorers menu.
To reject a request which has been submitted to you, click on the ‘Reject’ button (See Approving & Rejecting requests)
To approve a request which has been submitted to you, click on the ‘Approve’ button (See Approving & Rejecting requests)
To Recall or Amend PO, click on the Recall or Amend PO Button (See Amending Purchase Orders)
To email a link to the request (and grant read-access) to another eRequest user, click the ‘Email’ button.
To view the changes to a Request, click on the View History button. The track changes option in Management Studio controls when this button is available. When turned on any changes to the request will be logged,
To view the Budget summary information, click on the Budget Summary button, this display the Budget figures from each on the request lines together on one page.
To take and Return ownership of request, click on the Take Ownership and Return Ownership buttons, this are only available to administrator users. (See Request Ownership)
The attachments button allows you to attach files to this request, in a similar manner as attaching files to an email in Outlook. The attachments are stored in the eRequest database and can be access by anyone with access to the request. The attachments can be downloaded or removed at any time.
NOTE: As the attachments are stored in the eRequest database, adding lots of large attachments will add a significant amount of data to the database. The attachments are only available within eRequest and are NOT transferred to GP.
Entering a Request Line (PO Requests)
This page allows editing of request lines, if the Request Form this Request is based on has been altered the page may look different and some fields may not appear.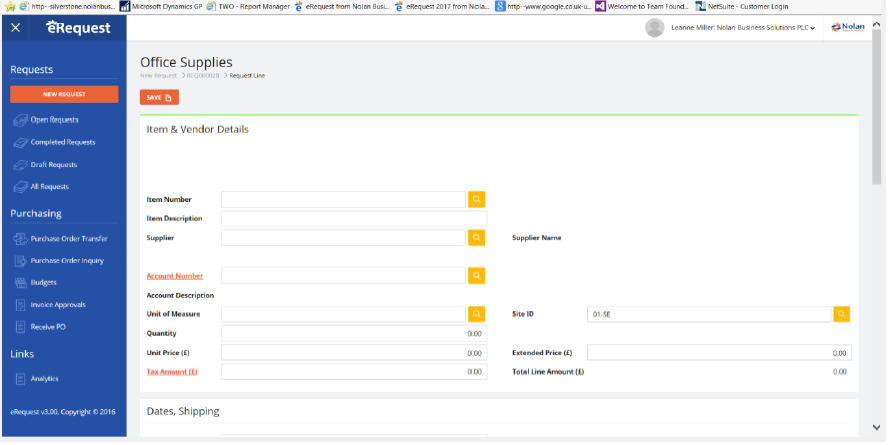
Item Number – This is the Item for this Request line; use the lookup to select it from the Dynamics GP inventory Master table
Item Description – The Item’s description from the Item Card in Dynamics GP
Vendor ID – This is the Vendor who will supply the item; use the lookup to select it from the Dynamics GP Vendor master table.
Vendor Name – The vendor’s name from the Vendor Card in Dynamics GP
Vendor Address Code – The Address ID of the vendor, this will default from the Vendor when it is selected, you can use the lookup to select a different address from the Vendors address. Click on the field label to zoom to a page which displays the full address details.
Account Number – This is the Account Number for this line, the field will display ‘#’ for segments which need to be filled in. Use the lookup to select an Account Number, the lookup will be filtered to only show those containing the segments already defaulted.
Account Description – The Account’s description from the Account Card in Dynamics GP
Unit of Measure – This is the Unit of Measure the item will be purchased in, use the lookup to select from available Units of Measure, it will show the Units of Measure available within the Purchasing Unit of Measure Schedule assigned to the item with the Item Card in Dynamics GP.
Site ID – This is the Location Code the item be delivered to, use the lookup to select a Location Code from the Location Code master within Dynamics GP
Quantity – The Quantity of items requested
Unit Price – The unit price of the item, this will default from ‘Current Cost’, ‘Standard Cost’ or ‘List Price’ on the Items Card within Dynamics GP depending on the option set against this request’s ‘Request Form’.
Extended Price – This is the Quantity x Unit Price
Extended Tax Amount – The tax amount for this line, there is also a Tax Distributions dialog available from the Expansion button next to this field. If you alter the Tax Amount, this Tax Distributions dialog may open for you to distribute the tax across the defaulted Tax Detail IDs. The Tax amount must be distributed correctly to Submit or Approve a request. The Tax calculation engine works in the same way as the Tax calculated in the Dynamics GP POP Entry window.
Required by Date – The date this item is required by, enter a date or use the lookup to select one
Expected Date – The date this item is expected by, enter a date or use the lookup to select one.
Is Prepayment Purchase – (only available with Budget Commitments Module) Indicates the Request is a Prepayment
Number of Purchase Periods – (only available with Budget Commitments Module) When ‘Is Prepayment Purchase’ is ticked this field indicates how may periods the request value will be distribute across starting from the ‘Required Date’. When calculating the ‘Value on untransferred requests’ only the distributed value falling in the calculated Budget range will be included.
Comment – A comment for this Request line, this will be transferred to the Purchase Orders line comment when this line is transferred to Dynamics GP
Shipping Method – You can use the lookup to pick a Shipping Method from Dynamics GP
Supplier Tax Schedule ID – You can use this to pick the Supplier Tax Schedule ID, this field is defaulted using the same rules as the POP Entry window in Dynamics GP
Item Tax Schedule ID – You can use this to pick the Item Tax Schedule ID, this field is defaulted using the same rules as the POP Entry window in Dynamics GP
Dynamics GP Purchase Order Information – The fields available in this section display the details of the Purchase Order once it has been created in Dynamics GP. Using the hyperlinks on the PO Receipt and PO Invoice labels, you are able to drilldown to see details of receipts and invoices entered against the Purchase Order and the payment status of the invoices.
Dynamics GP PO Number – The Purchase Order Number within Dynamics GP this line was transferred to.
Dynamics GP Receipt Numbers – When the Purchase Order line has been received within Dynamics GP, this field display the Receipt numbers. If the purchase order line was split across receipt lines, the field display the first receipt number and ‘….’ – click on the field label to display the complete details of receipts.
Dynamics GP PO Record Note – This displays the Record Note entered in Dynamics GP against the Purchase Order.
Budget Commitments - (Section only available with Budget Commitments Module)
Additional fields are available for display to the user which define the level of expenditure already made in relation to the budget giving users and authorisers a view of the value of the commitment and the value left on the budget.
The additional fields will be displayed at Request Line level
- Annual Budget Value – This value is taken from the Budget Setup in Dynamics GP
- Value spent Year to Date (GL) – This value includes only transactions POSTED into the General Ledger in the current financial year.
- Value Received – This value is taken from all shipment and shipment with invoice transactions not yet posted through POP irrespective of date.
- Value on orders – This value is taken from open Purchase orders (i.e. not shipped or invoiced) irrespective of date.
- Value on untransferred requests – This value is taken from the eRequest database of request lines that have not been submitted, approved or sent to PO. Again irrespective of date
- Percentage of Budget Remaining – This value is calculated as A/(B+C)
The Setup option on the user on the form allows definition of a notification level at each of the validation points. The warning levels will be “Error” and “Ignore”.
Validators - On Line Save
Validators - On Header Submit
Validators - On Header Approve
As each request line is entered, as the account number is defaulted or entered, the budgeted value (A) and the year to date values will be read from the General Ledger module (B) of the Microsoft Dynamics Company. These are displayed along with the value of any Purchase Order lines (C) and (D) in Dynamics GP with that account number assigned and any untransferred request lines (E).
At the relevant validation points (above) the system applies the warning level specified for that user on that form.
Request Commitments are only active if the currency of the request line is the Functional Currency of the Dynamics GP Company and Commitments are validated against the total year budget.
User Defined Fields – a number of user defined fields are proved, 4 fields of each type are available (string, decimal, date and picklist). You can show/hide these fields in Management Studio form design.
Entering a Request Line (Stock Requests)
This page allows editing of request lines, if the Request Form this Request is based on has been altered the page may look different and some fields may not appear.
Item Number – This is the Item for this Request line; use the lookup to select it from the Dynamics GP inventory Master table
Item Description – The Item’s description from the Item Card in Dynamics GP
Unit of Measure – This is the Unit of Measure the item will be picked in, use the lookup to select from available Units of Measure, it will show the Units of Measure available within the Purchasing Unit of Measure Schedule assigned to the item with the Item Card in Dynamics GP.
Stock Location Code – This is the Location Code the item be picked from, use the lookup to select a Location Code from the Location Code master within Dynamics GP
Stock Qty Available – Once the Ite.m, UofM and Stock Location Code are entered, the Quantity available will be calculated, this is based on the current Stock Available figure from the GP Stock Location, minus any requests in eRequest for this item which are still pending, minus the Quantity Requested on this request.
Account Number – This is the Account Number for this line, the field will display ‘#’ for segments which need to be filled in. Use the lookup to select an Account Number, the lookup will be filtered to only show those containing the segments already defaulted.
Account Description – The Account’s description from the Account Card in Dynamics GP
Quantity – The Quantity of items requested
Required by Date – The date this item is required by, enter a date or use the lookup to select one
Expected Date – The date this item is expected by, enter a date or use the lookup to select one.
Comment – A comment for this Request line.
User Defined Fields – a number of user defined fields are proved, 4 fields of each type are available (string, decimal, date and picklist). You can show/hide these fields in Management Studio form design.
