Introduction
Once your setup is complete, you can begin to Reconcile Transactions. Auto-Match Rules can be used to speed up the reconciliation process. These Rules are used when the Auto-Match button is used in the Reconcile window. Each Bank Statement Transaction is checked against the NetSuite General Ledger Transactions for matched as per the Rules established for Auto-Match. Each Rule can be set up as a Global setting or Per ABR Reconciliation Account.
If the Rules find a Transaction that applies to them, the transactions are Matched.
Please Note: You must import a transaction type from the bank statement to use Auto-Match rules.
Creating Auto-Match Rules
When creating Auto-Match Rules you have 6 main Search Factors in the Matching Process. These are:
General Fields
Date Fields
Document/Cheque Number
Reference
Tolerance Amount/Percentage
Transaction Types
You can set Search Criteria by activating/deactivating each Search Factor mentioned above. Each Search Factor can be as broad or narrow as you wish, based on Days, Transaction Numbers, Transaction References and Transaction Types.
Please Note: Not all search factors are necessary when matching transactions. The more search factors you use the stricter the matching process will be.
If ABR is not automatically matching the transactions you think it should be, you are able to come back and change the match rules at any time.
To find the Auto-Match Rules Window, go to More Options -> ABR -> ABR Setup -> Auto-Match Rules.
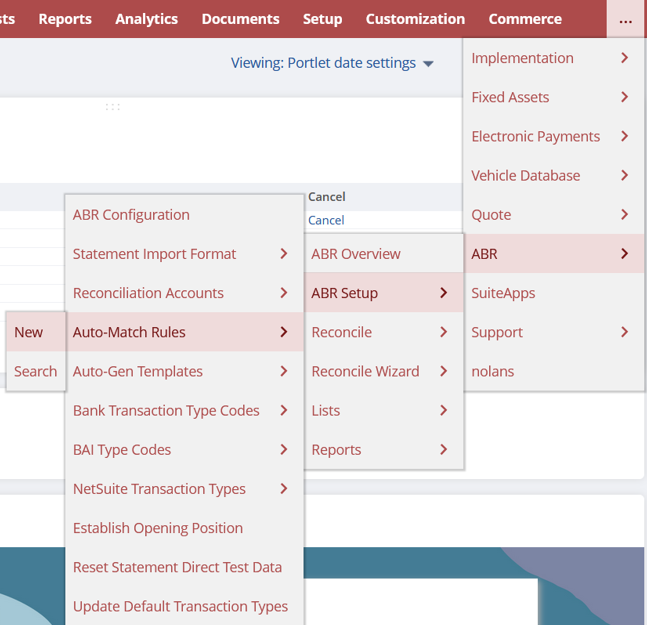
To set up a new Auto-Match Rule, click New ABR Auto-Match Rules as seen below.

General Fields
This section will walk you through the Fields which can be populated to form new Auto-Match Rules.
Transaction Type - This will be the Transaction Type defined by your Bank File. This is a Required Field.
Description – This is the Full Transaction Type Description e.g., Cheque.
Restrict to ABR Reconcile Account – This allows you to Restrict this ruleset to a Reconciliation Account. If left blank this ruleset will apply to All reconciliation accounts. Also, if One rule is restricted for an ABR reconcile account, then All rules must also be restricted. It is Recommended that this field is left Blank.
Priority – This will determine the Processing Sequence. The Higher the number, the Lower the priority. If you have Multiple Rules for the same Transaction Type, you should use Multiple Priorities.
Inactive – Tick this box if you wish to Disable this ruleset.
Date Fields
The Auto-Match process will Always assume the Bank Transaction Date will be the Same as the NetSuite Transaction Date or After the NetSuite Transaction Date. This Still applies if No Match Rule has been set up for a Transaction Type.
If it common for your Bank Transaction Date to be Prior to the NetSuite Transaction, you will need to create a Date Auto-Match Rule with the To Date populated with a value Greater than 0.

Use Date - Tick this box to Activate the Date of a Transaction when Matching Transactions.
From – Treat the value entered in this box as Days, e.g., -5. The system will include NetSuite Transactions dated up to 5 Days Prior to the Bank Transaction Date when searching for matches. This is a Required Field if Bank Transaction Dates are Before NetSuite Transaction Dates.
To - Treat the value entered in this box as Days, e.g., -5. The system will include NetSuite Transactions dated up to 5 Days After the Bank Transaction Date when searching for matches. This is a Required Field if Bank Transaction Dates are Before NetSuite Transaction Dates.
Document/Cheque Number
The Document/Cheque Number will Match Transactions by Document Number or Cheque Numbers from the Bank Statement. Activating the Document/Cheque Number Search Factor will match transactions in the General Ledger to the bank statement if they contain the Same Digits.
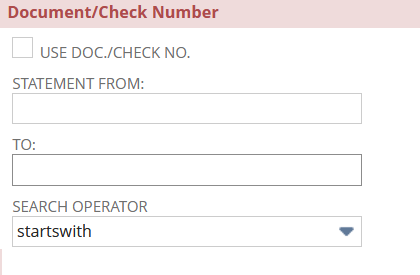
Use Document/Cheque Number – Tick this box to Activate the Document/Cheque Number rule when Matching Transactions.
Statement From – If your Bank Cheque Numbers contains a Different number of Characters than your General Ledger Cheque Numbers, enter the First Digit you want the Matching Tool to Include in the search. For example, if your Bank Cheque Number is 005001, and your NetSuite Cheque Number is 5001, enter 3 into the Statement From Field to start the search by Skipping the first two digits.
To – Much like the Statement From Field, the To Field will determine the Last Digit you want to Include in the search. If the digits Between 3 & 6 of the Bank Statement Document/Cheque Number Match the Document/Cheque Number of the General Ledger, they will be Matched.
If the Cheque Numbers are the Same Length in NetSuite and the Bank Statement you can leave these two fields Empty.
Search Operator – Select the relevant Search Operator, a description of each can be found below.
Starts with – This will Match transactions Only if the General Ledger Value Begins with the Specified Bank Statement Value.
Contains – This will Match transactions Only if the General Ledger Value Contains the Specified Bank Statement Value.
IS – This will Only Match transactions if the General Ledger value Matches the Bank Value Exactly.
Reference
Use the Reference Search Factor to Match Transactions between the General Ledger and the Statement based on their Reference/Memo Values.
Under the Reference tab, you will find the following Fields.
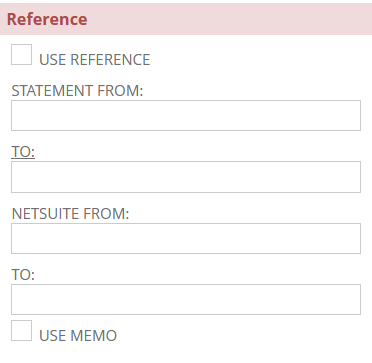
Use Reference – Tick this box if you wish to Activate the Reference of a Transaction when Matching.
Statement From – Make sure you enter the First Character you want the matching tool to Include in the Statement Search.
To – Make sure you enter the Last Character you want the matching tool to Include in the Statement Search.
NetSuite From – Enter the First Digit you wish to Match the Statement Reference to.
To - Enter the Last Digit you wish to Match the Statement Reference to.
Use Memo – Tick this box to use the Memo Field on Non-Journal Transactions for Matching by Reference. If the box is Not ticked, the system will use the Entity Field on the NetSuite side to Match Against the Reference Field on the Bank Statement.
NOTE: Journal Transactions will ignore the selection and use the memo field.
NOTE: If the Reference is TRANSFER on the Statement but NWTRANSFER on NetSuite, you need to set the NetSuite To/From Field values as:
NetSuite From = 3
To = 10
This will Exclude the Prefix and Match using Only the Characters in TRANSFER.
Tolerance
Tolerance rules allow for ‘close’ Matches to be made, where the Difference is Less than or Equal to the Tolerance Amount or Tolerance Percentage of the Amount. A Date, Document/Cheque Number, or Reference needs to be completed to identify which Transactions to compare.
It is Recommended you use a Higher Priority Value Rule for the Tolerance Rules vs the Exact Match Rules before running Close Matches to avoid unnecessary postings. This will make sure the Exact Amount Matches post before the Tolerances.
Under the Tolerance tab you will see the following Fields.
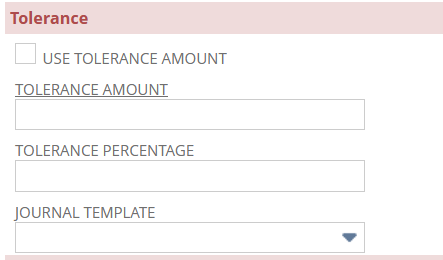
Use Tolerance Amount – Tick this box to Activate the Tolerance Amount or Tolerance Percentages.
Tolerance Amount – Enter the Absolute Value of the amount the Bank Transactions can differ from the NetSuite Transaction.
OR
Tolerance Percentage – Enter the Percentage Difference the Bank and NetSuite Transaction can differ by.
NOTE: Tolerance percentage takes precedent over tolerance amount if both fields are populated.
Journal Template – Enter the Internal ID of the Auto-Generate Template to be used for the Balancing Journal when Matching with a Tolerance. For New Templates, click the + button and create a New Auto-Gen Template.
Transaction Types
Transaction Types allow you to narrow down the matching process to the Types of Transactions in the Statement and General Ledger.
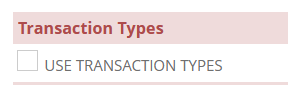
Transaction Type Steps
Tick the Use Transaction Types tickbox to use the NetSuite Transaction Type when Matching Transactions.
Below you will see tickboxes for each Transaction Type. Tick the boxes you wish to Include in the matching process.

Now click Save to create your new Auto-Match Rule.
Grouping
Grouping allows you to create Rules for matching Many NetSuite Transactions to One Bank Transaction, Many NetSuite Transactions to Many Bank Transactions, or One NetSuite Transaction to Many Bank Transactions.
You will see two options below. NetSuite Line Grouping and Statement Lines Grouping.

NetSuite Lines Grouping specifies whether to use Single Line or Group Matching on the NetSuite side. Your options will be:
None- Single Lines Only - This will not use Grouping.
Grouped Lines – This will Group NetSuite Transactions based on selected Fields.
Statement Lines Grouping is the same as above but on the Bank Side.
Grouping – NetSuite
This section will examine the Fields in the NetSuite grouping section as seen below.
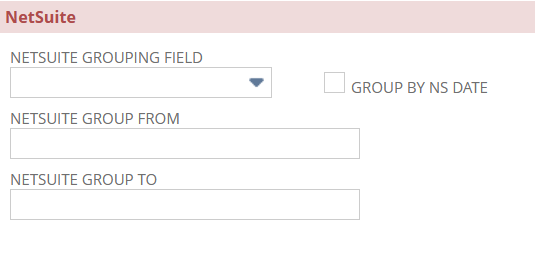
NetSuite Grouping Field – This defines which NetSuite Field will be Evaluated to Group Transactions. These are as follows:
Document/Cheque Number – Use the Group From/To boxes to evaluate only a Portion of the Value. For example, to Group ACH transactions, evaluate the characters that contain the Unique Batch ID.
Entity Name – Use the NetSuite Entity Name to group transactions. (Customer, Vendor, etc.)
Memo – Use the NetSuite Memo Field to evaluate transactions to a group.
Date – Use the NetSuite Transaction Date Field to evaluate transactions to a group.
Group by NS Date – Tick this box to group NetSuite Entries by Date, In Addition to any other grouping.
Statement Grouping Field – This defines which Bank Field will be Evaluated to Group Transactions. These are as follows:
Cheque Number – Use the Bank Cheque Number to evaluate transactions to a group. Use the Group To/From Fields to evaluate only a Portion of the Value.
Reference – Use the Bank Reference Field to evaluate transactions to a group.
Date – Use the Bank Date Transaction Field to evaluate transactions to a group.
Group by Bank Date – Tick this box to group Bank Entries by Date, In Addition to any other grouping.
